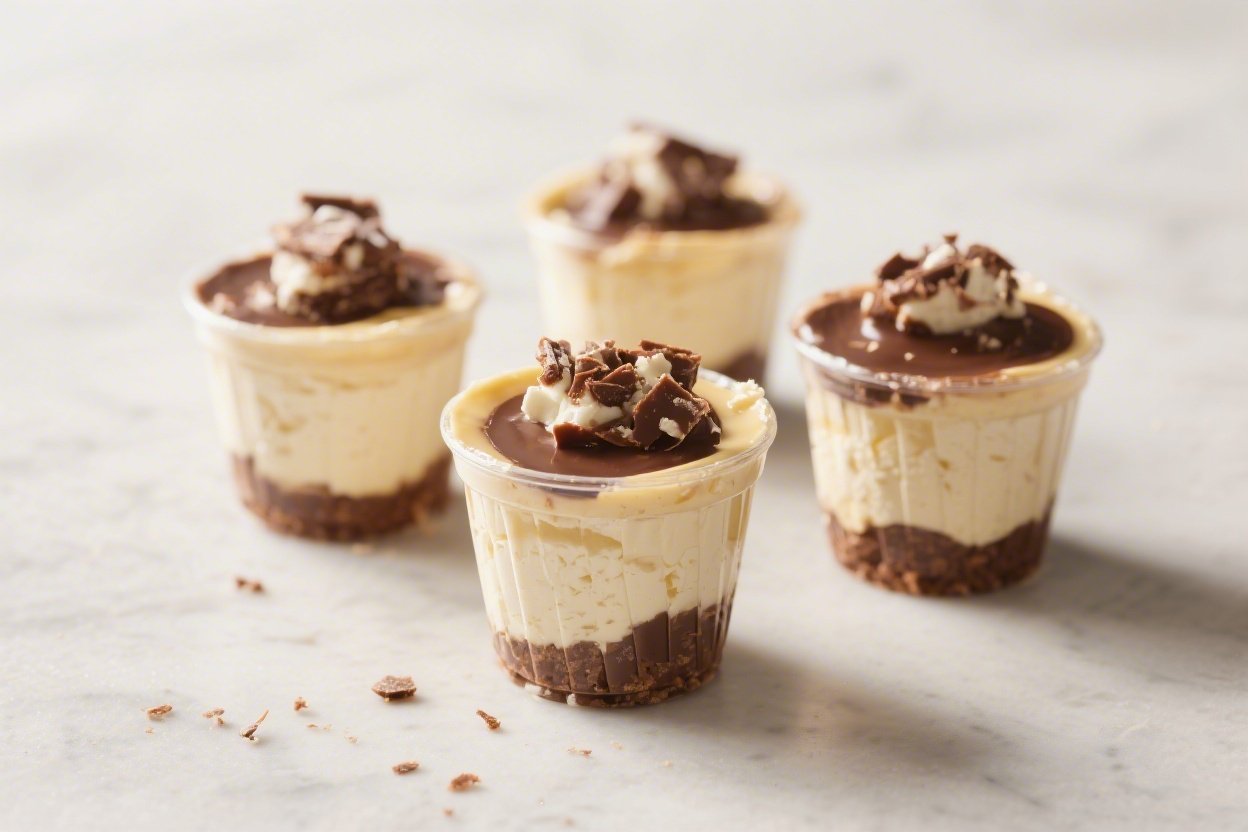
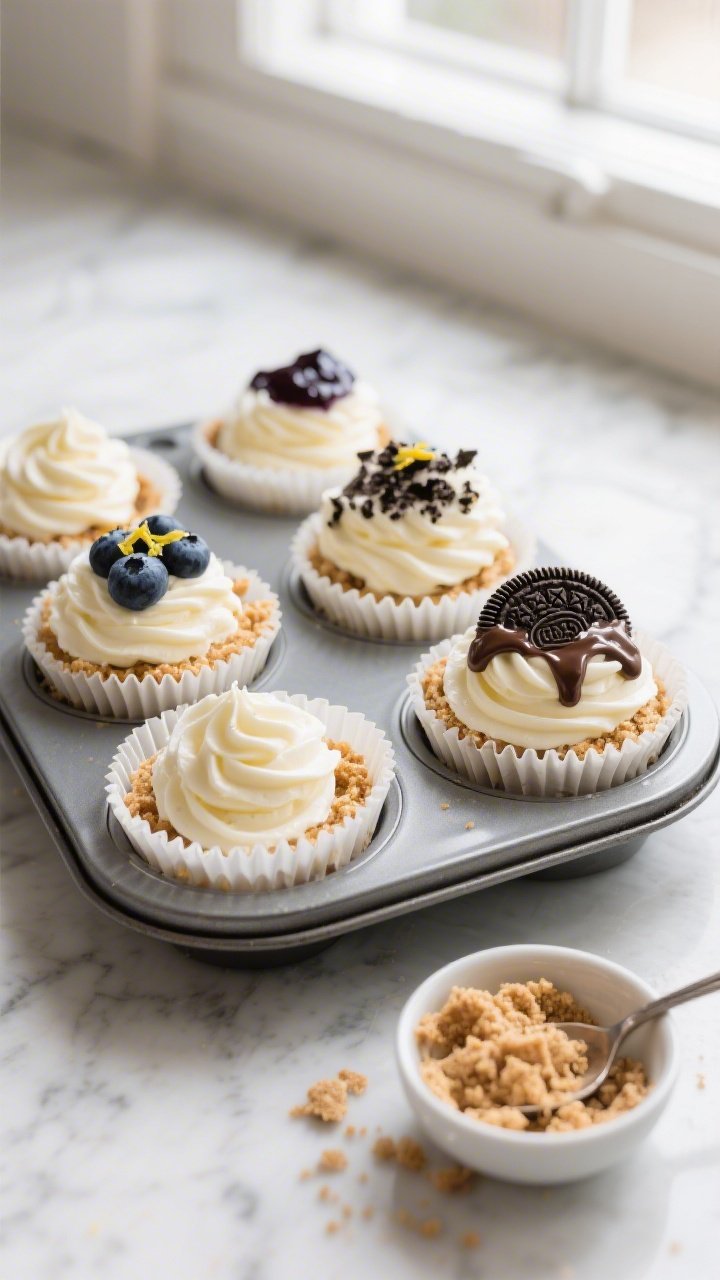
No Bake Cheesecake Crack Cups – Creamy, Crunchy, and Effortless
No Bake Cheesecake Crack Cups are the kind of dessert you pull together when you want something that feels special without turning on the oven. They’re creamy, a little tangy, and have just the right amount of crunch. Best of all, they set up in the fridge, so you can make them ahead for parties or weeknight treats.
If you love cheesecake flavor but prefer bite-size portions, these cups hit the spot. They’re simple, reliable, and easy to customize with your favorite toppings.
Ingredients
Method
- Prep your crust. In a bowl, combine the crushed graham crackers (or your chosen base), melted butter, a tablespoon of sugar (optional), and a pinch of salt. Stir until the crumbs are evenly moistened and hold together when pressed.
- Pack the base. Spoon about 2 tablespoons of the crumb mixture into each jar or lined muffin cup. Press down firmly with the back of a spoon to create a tight layer. Chill while you make the filling.
- Beat the cream cheese. In a large bowl, beat softened cream cheese with granulated sugar until smooth and fluffy, about 2–3 minutes. Scrape the bowl to ensure no lumps.
- Add flavor. Mix in vanilla and lemon juice. If using Greek yogurt or sour cream, blend it in now for extra creaminess and tang.
- Whip the cream. In a separate chilled bowl, whip the heavy cream with powdered sugar to stiff peaks. The peaks should stand up straight when you lift the beaters.
- Fold gently. Using a spatula, fold the whipped cream into the cream cheese mixture in two additions. Keep it light to preserve the airy texture.
- Fill the cups. Spoon or pipe the cheesecake filling over the chilled crusts, leaving a little space at the top for toppings. Smooth the surface with a spoon.
- Chill to set. Cover and refrigerate for at least 3 hours, preferably overnight. This helps the cups firm up and the flavors meld.
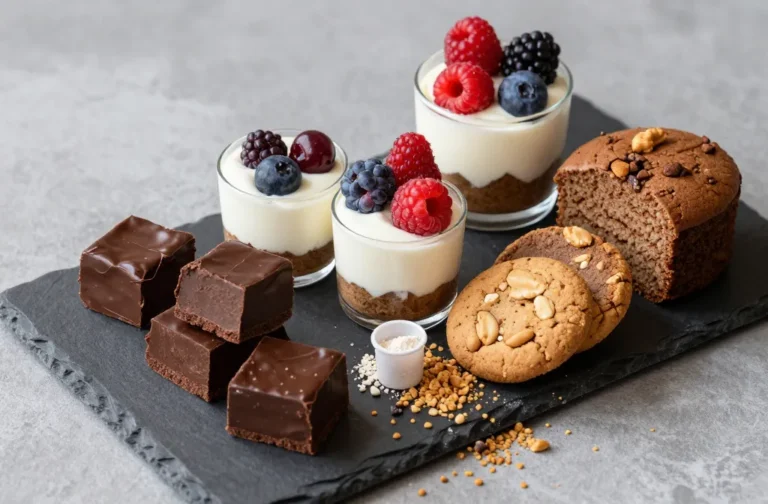
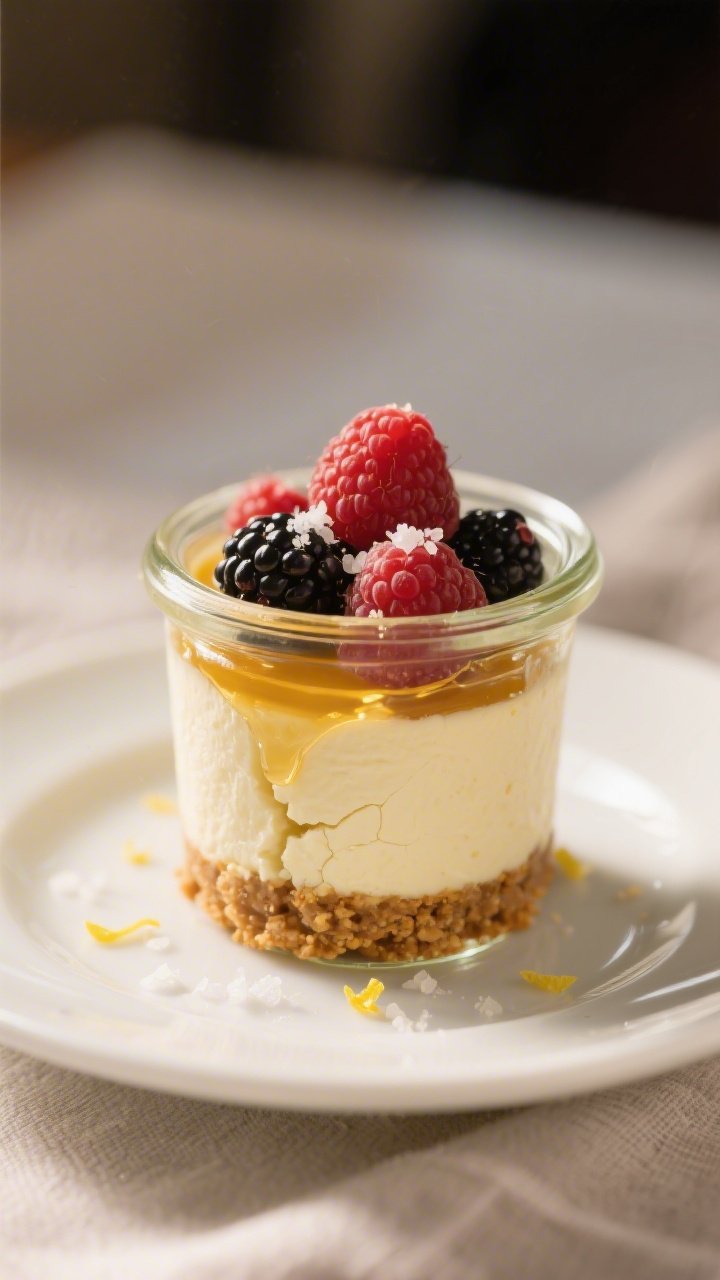
- Add toppings. Right before serving, finish with your favorite toppings—berries and a drizzle of honey, a spoonful of lemon curd, or crushed Oreos with chocolate sauce.
- Serve cold. These are best enjoyed chilled when the filling is creamy and the crust still has a little crunch.
Overeating is a pattern. This helps you fix that problem. A quick reset for cravings, snacking, and “I’ll start tomorrow” moments.
Built for busy home cooks who want real-life structure. Simple steps that fit meal prep, family dinners, and late-night snack attacks.
What Makes This Special
These cheesecake cups come together in minutes and require zero baking, which means no fussing with water baths or cracked tops. The texture is silky and light, thanks to a blend of cream cheese and whipped cream that sets beautifully.
The base layers offer crunch and contrast, and each cup delivers that classic cheesecake tang in a snackable format. They’re also naturally portioned, so serving is a breeze. Whether you’re hosting or treating yourself, these check all the boxes for flavor, ease, and presentation.
What You’ll Need
- Cream cheese: 16 ounces (two blocks), softened to room temperature
- Granulated sugar: 1/2 cup, or adjust to taste
- Vanilla extract: 2 teaspoons
- Lemon juice: 1–2 tablespoons for brightness (fresh is best)
- Heavy whipping cream: 1 cup, cold
- Powdered sugar: 2 tablespoons (helps stabilize the whipped cream)
- Greek yogurt or sour cream (optional): 1/4 cup for extra tang and silkiness
- Butter: 4 tablespoons, melted
- Crunchy base options: 1 1/2 cups crushed graham crackers, vanilla wafers, Oreos, or pretzels
- Pinch of salt: To balance sweetness in the crust
- Toppings (choose your favorites): Fresh berries, berry compote, lemon curd, caramel sauce, chocolate shavings, chopped nuts, or a drizzle of honey
- Tools: Mixing bowls, hand mixer or stand mixer, spatula, 10–12 small jars or cupcake liners in a muffin tin
Step-by-Step Instructions
- Prep your crust. In a bowl, combine the crushed graham crackers (or your chosen base), melted butter, a tablespoon of sugar (optional), and a pinch of salt.
Stir until the crumbs are evenly moistened and hold together when pressed.
- Pack the base. Spoon about 2 tablespoons of the crumb mixture into each jar or lined muffin cup. Press down firmly with the back of a spoon to create a tight layer. Chill while you make the filling.
- Beat the cream cheese. In a large bowl, beat softened cream cheese with granulated sugar until smooth and fluffy, about 2–3 minutes.
Scrape the bowl to ensure no lumps.
- Add flavor. Mix in vanilla and lemon juice. If using Greek yogurt or sour cream, blend it in now for extra creaminess and tang.
- Whip the cream. In a separate chilled bowl, whip the heavy cream with powdered sugar to stiff peaks. The peaks should stand up straight when you lift the beaters.
- Fold gently. Using a spatula, fold the whipped cream into the cream cheese mixture in two additions.
Keep it light to preserve the airy texture.
- Fill the cups. Spoon or pipe the cheesecake filling over the chilled crusts, leaving a little space at the top for toppings. Smooth the surface with a spoon.
- Chill to set. Cover and refrigerate for at least 3 hours, preferably overnight. This helps the cups firm up and the flavors meld.
- Add toppings. Right before serving, finish with your favorite toppings—berries and a drizzle of honey, a spoonful of lemon curd, or crushed Oreos with chocolate sauce.
- Serve cold. These are best enjoyed chilled when the filling is creamy and the crust still has a little crunch.
Storage Instructions
- Refrigerate: Store covered in the fridge for up to 4 days.
Add fresh fruit just before serving to prevent weeping.
- Freeze: Freeze without fresh fruit for up to 2 months. Thaw overnight in the fridge. The texture stays surprisingly smooth.
- Make-ahead tips: Assemble the crust and filling up to 24 hours in advance.
Keep toppings separate until serving.

Health Benefits
No Bake Cheesecake Crack Cups are a treat, but you can nudge them in a lighter direction without losing flavor. Cream cheese provides protein and calcium, and using Greek yogurt or reduced-fat cream cheese can cut saturated fat. Fresh berries add fiber, vitamin C, and antioxidants that balance the richness.
Choosing a nut-based crust or adding chopped nuts boosts healthy fats for better satiety. Portion control is built in, which helps manage calories more easily than a traditional cheesecake.
Common Mistakes to Avoid
- Using cold cream cheese: This leads to lumps. Let it sit at room temperature for 30–60 minutes before mixing.
- Overmixing the whipped cream: If you go past stiff peaks, it can become grainy.
Stop as soon as peaks hold their shape.
- Skipping the chill time: The filling needs several hours to set or it will feel loose and messy.
- Watery toppings: Juicy fruits can leak. Pat berries dry or use a thickened compote.
- Too much butter in the crust: An oily base can seep and get soggy. Add just enough for the crumbs to hold together when pressed.
Recipe Variations
- Chocolate Dream: Add 2 tablespoons cocoa powder to the crust and fold mini chocolate chips into the filling.
Top with chocolate shavings.
- Strawberry Shortcake: Use crushed vanilla wafers for the base and top with macerated strawberries and a touch of basil.
- Lemon Blueberry: Stir lemon zest into the filling and finish with blueberry compote and a lemon zest sprinkle.
- Salted Caramel Pretzel: Make a pretzel crust and top with caramel sauce and a pinch of flaky sea salt.
- Oreo Lovers: Oreo crust, crushed Oreo folded into the filling, and a cookie piece on top.
- High-Protein Boost: Swap 1/2 cup of the cream cheese with vanilla Greek yogurt and add 1 scoop unflavored or vanilla whey. Whip gently to avoid a chalky texture.
- Lower-Sugar Option: Use a granular sugar substitute and skip the crust sugar. Choose fresh berries or a no-sugar compote.
- Gluten-Free: Use gluten-free graham crackers or a nut-and-date crust pulsed in a food processor.
FAQ
Why are they called “crack cups”?
It’s a playful nickname that nods to how irresistibly tasty they are—creamy, sweet, and hard to stop at just one.
There are no unusual ingredients; it’s simply about flavor and texture.
Can I make these without heavy cream?
Yes. You can substitute with whipped coconut cream or fold in 1/2 cup Greek yogurt and use less liquid to keep it thick. The texture will be slightly denser but still delicious.
How do I prevent a runny filling?
Beat the cream cheese until completely smooth, whip the cream to stiff peaks, and chill for at least 3 hours.
If using yogurt, don’t overdo it—too much adds moisture.
What’s the best container to use?
Small glass jars, ramekins, or a lined muffin tin work great. Jars make storage and transport easy, while muffin cups are perfect for parties and quick serving.
Can I cut the recipe in half?
Absolutely. Halve every ingredient and taste the sweetness as you go.
You’ll get about 5–6 cups depending on your container size.
Is there a way to add more tart flavor?
Add extra lemon juice and zest, or swap some sugar for a tangy fruit spread. A swirl of lemon curd on top also boosts tartness without thinning the filling.
How far in advance can I assemble them?
You can assemble them up to 24 hours ahead and keep them covered in the fridge. Add fresh toppings shortly before serving to maintain texture.
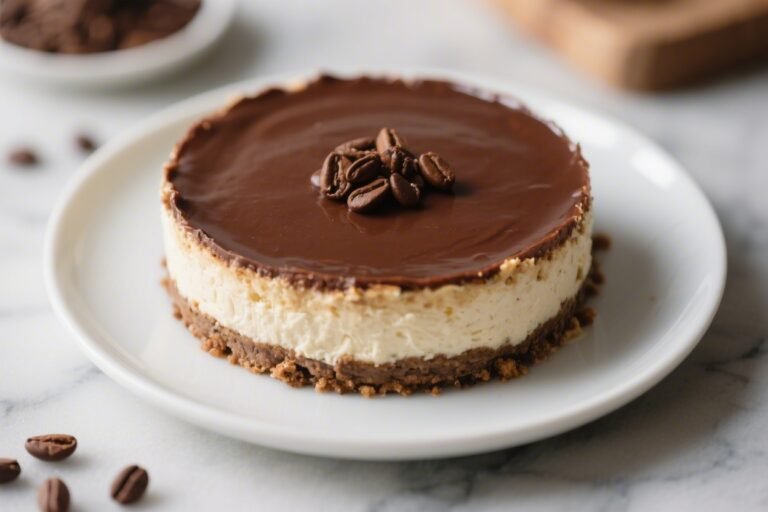
Can I make a single large no-bake cheesecake with this?
Yes.
Press the crust into a 9-inch springform pan and spread the filling evenly. Chill overnight for the cleanest slices.
Wrapping Up
No Bake Cheesecake Crack Cups deliver everything you love about cheesecake with none of the hassle. The creamy filling, crunchy base, and endless topping options make them a crowd-pleaser and a weeknight favorite.
Keep the ingredients on hand, and you can whip up an impressive dessert anytime. Simple, reliable, and seriously good—these cups are the kind you’ll make again and again.
Printable Recipe Card
Want just the essential recipe details without scrolling through the article? Get our printable recipe card with just the ingredients and instructions.