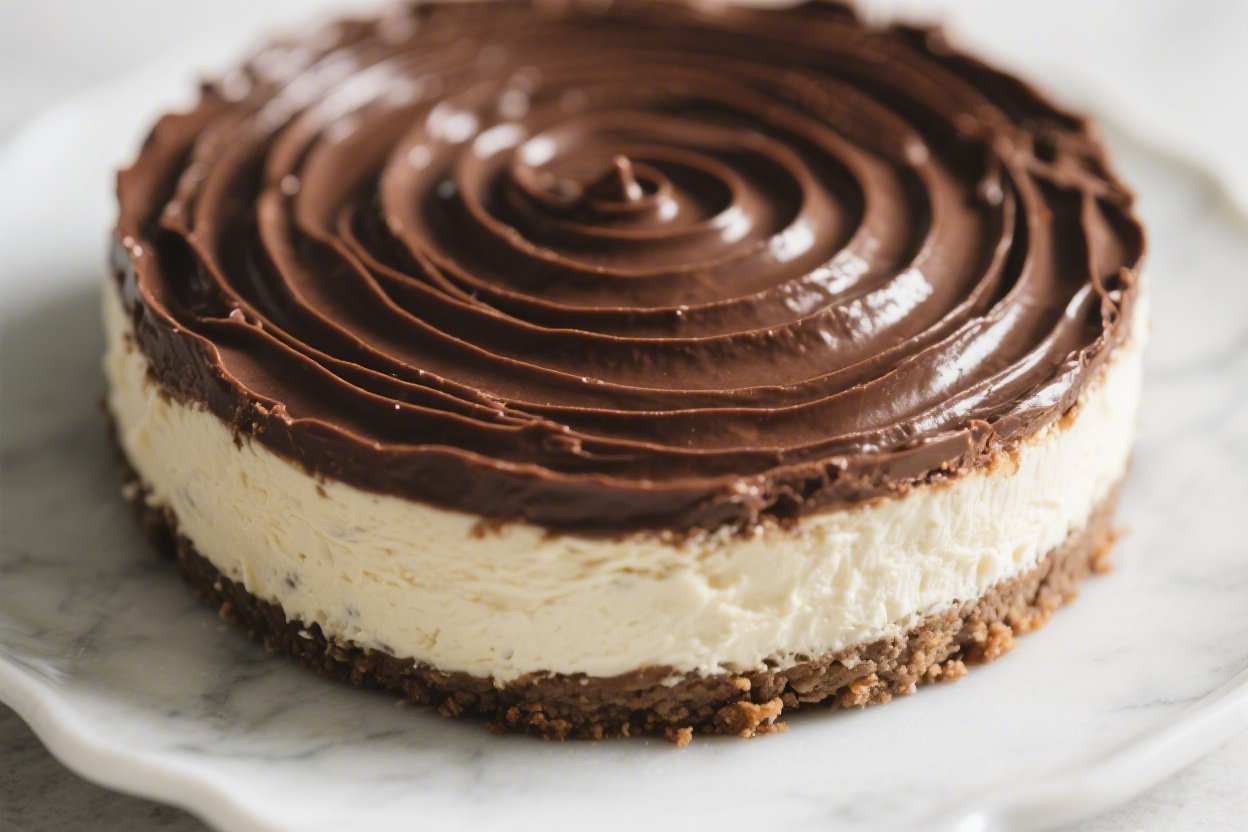
No Bake Chocolate Swirl Cheesecake – Creamy, Simple, and Beautiful
This no bake chocolate swirl cheesecake is smooth, rich, and surprisingly easy to pull together. It looks like something you’d find at a fancy bakery, but you can make it in your own kitchen with basic ingredients. No oven, no water bath, no stress.
The chocolate swirl gives it a beautiful marbled finish, and the texture is light yet satisfying. If you’re after a crowd-pleasing dessert that feels special with minimal effort, this is the one.
Ingredients
Method
- Prep your pan: Line the bottom of a 9-inch springform pan with parchment paper. Lightly grease the sides. This makes for a cleaner release and neat slices.
- Make the crust: Crush graham crackers into fine crumbs. Stir with sugar and salt. Add melted butter and mix until the texture feels like wet sand. Press firmly into the bottom of the pan. Use the bottom of a measuring cup to pack it tight. Chill while you make the filling.
- Melt the chocolate: Combine chopped chocolate and 2 tablespoons cream in a heatproof bowl. Microwave in 15–20 second bursts, stirring between each, until smooth and glossy. Set aside to cool slightly; it should be pourable but not hot.
- Bloom the gelatin: Sprinkle gelatin over 2 tablespoons cold water. Let it sit for 5 minutes to soften. Microwave for 10–12 seconds to dissolve. Cool to room temperature. If skipping gelatin, see the note in step 5.
- Whip the cream: In a cold bowl, whip the heavy cream to medium-stiff peaks. If not using gelatin, whisk 1 tablespoon cornstarch with the powdered sugar first, then proceed—this helps the filling set. Keep the whipped cream chilled.
- Beat the cream cheese: In a large bowl, beat softened cream cheese until very smooth, about 1–2 minutes. Add powdered sugar, vanilla, and lemon juice. Beat until creamy, scraping the bowl as needed.
- Add the gelatin: With the mixer running on low, stream in the cooled, melted gelatin. Mix just to combine. This step keeps the texture silky and stable.
- Fold in whipped cream: Gently fold the whipped cream into the cream cheese mixture in two additions. Use a spatula and light strokes to keep the filling airy.
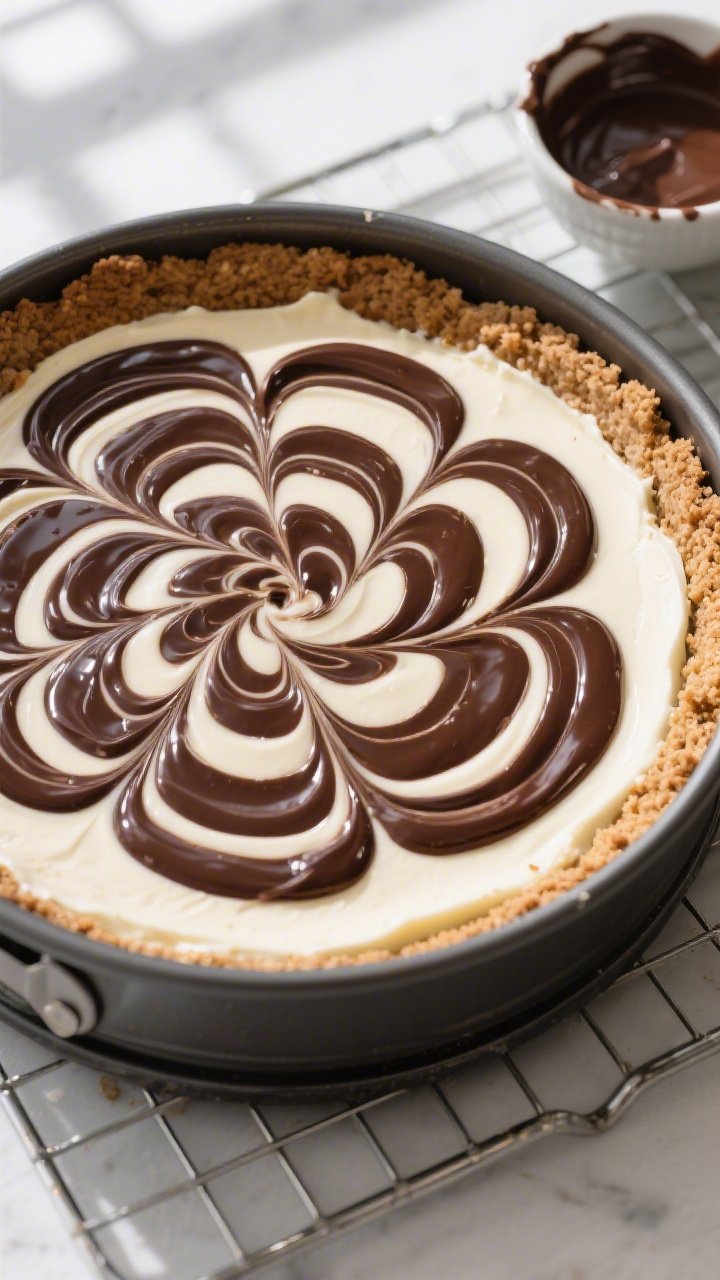
- Assemble the swirl: Pour about two-thirds of the filling over the chilled crust and smooth the top. Drizzle several spoonfuls of melted chocolate over it. Add the remaining cheesecake filling. Tap the pan gently to settle.
- Create the marble effect: Use a thin knife or skewer to swirl the remaining melted chocolate through the top in gentle figure-eights. Don’t overmix—2–3 passes are enough for a clean pattern.
- Chill to set: Cover and refrigerate at least 6 hours, preferably overnight. The center should feel firm to the touch.
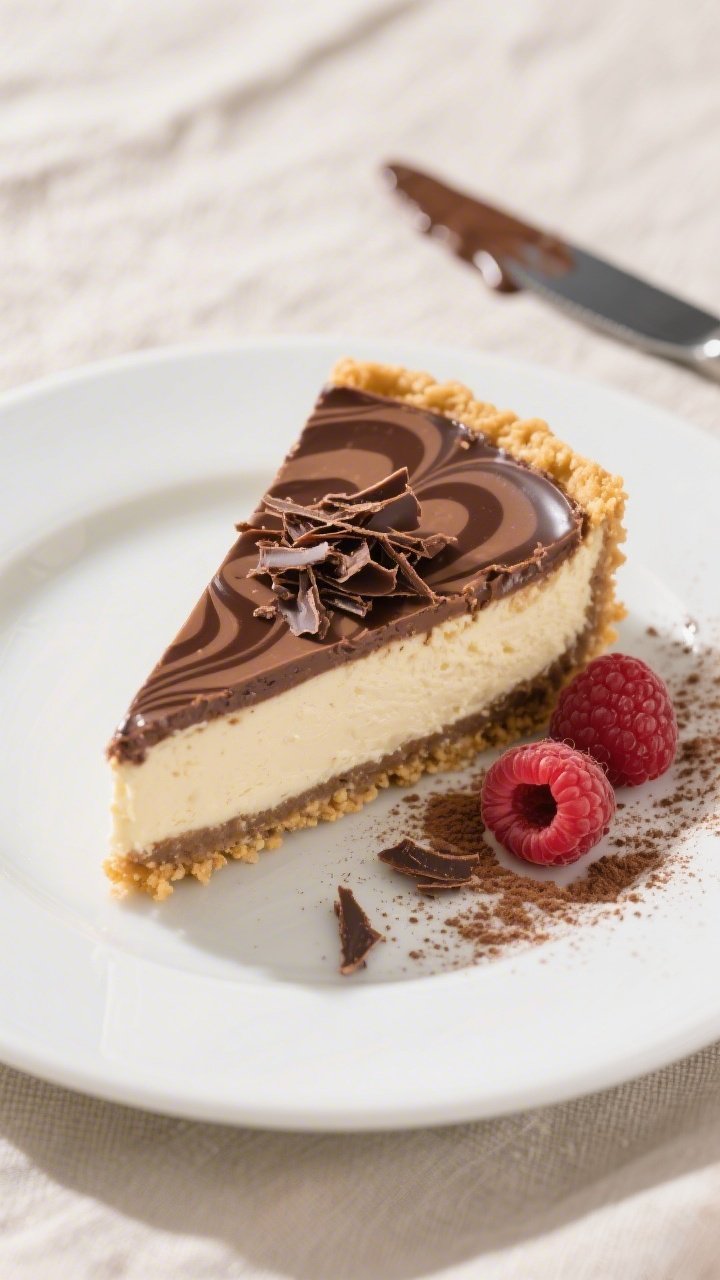
- Release and garnish: Run a thin knife around the inside edge of the pan, then unclasp the ring. Slide onto a serving plate. Add chocolate shavings or berries if you like. Slice with a hot, dry knife for clean edges.
Overeating is a pattern. This helps you fix that problem. A quick reset for cravings, snacking, and “I’ll start tomorrow” moments.
Built for busy home cooks who want real-life structure. Simple steps that fit meal prep, family dinners, and late-night snack attacks.
Why This Recipe Works
- No baking required: The filling sets in the fridge, so you skip the risk of cracks or overbaking.
- Balanced texture: A mix of cream cheese and whipped cream creates a creamy, airy bite that still feels decadent.
- Stable structure: A touch of gelatin (or an easy alternative) helps the cheesecake hold its shape without being rubbery.
- Clean chocolate flavor: Melted dark chocolate gives a deep, not-too-sweet swirl that contrasts the vanilla filling.
- Fast assembly: The crust takes minutes, and the rest is simple whisk-and-fold work.
Shopping List
- For the crust:
- Graham crackers (about 10 full sheets) or digestive biscuits
- Unsalted butter (6 tablespoons), melted
- Granulated sugar (2 tablespoons)
- Pinch of salt
- For the filling:
- Cream cheese (16 ounces), full-fat, softened
- Powdered sugar (3/4 cup), sifted
- Vanilla extract (2 teaspoons)
- Lemon juice (1 tablespoon) to brighten flavor
- Heavy whipping cream (1 cup), very cold
- Unflavored gelatin (1 teaspoon) + cold water (2 tablespoons), or use 1 tablespoon cornstarch as an alternative
- For the chocolate swirl:
- Dark or semi-sweet chocolate (4 ounces), chopped
- Heavy cream (2 tablespoons) for melting the chocolate
- Optional garnish:
- Chocolate shavings, cocoa powder, or fresh berries
How to Make It
- Prep your pan: Line the bottom of a 9-inch springform pan with parchment paper. Lightly grease the sides.
This makes for a cleaner release and neat slices.
- Make the crust: Crush graham crackers into fine crumbs. Stir with sugar and salt. Add melted butter and mix until the texture feels like wet sand.
Press firmly into the bottom of the pan. Use the bottom of a measuring cup to pack it tight. Chill while you make the filling.
- Melt the chocolate: Combine chopped chocolate and 2 tablespoons cream in a heatproof bowl.
Microwave in 15–20 second bursts, stirring between each, until smooth and glossy. Set aside to cool slightly; it should be pourable but not hot.
- Bloom the gelatin: Sprinkle gelatin over 2 tablespoons cold water. Let it sit for 5 minutes to soften.
Microwave for 10–12 seconds to dissolve. Cool to room temperature. If skipping gelatin, see the note in step 5.
- Whip the cream: In a cold bowl, whip the heavy cream to medium-stiff peaks.
If not using gelatin, whisk 1 tablespoon cornstarch with the powdered sugar first, then proceed—this helps the filling set. Keep the whipped cream chilled.
- Beat the cream cheese: In a large bowl, beat softened cream cheese until very smooth, about 1–2 minutes. Add powdered sugar, vanilla, and lemon juice.
Beat until creamy, scraping the bowl as needed.
- Add the gelatin: With the mixer running on low, stream in the cooled, melted gelatin. Mix just to combine. This step keeps the texture silky and stable.
- Fold in whipped cream: Gently fold the whipped cream into the cream cheese mixture in two additions.
Use a spatula and light strokes to keep the filling airy.
- Assemble the swirl: Pour about two-thirds of the filling over the chilled crust and smooth the top. Drizzle several spoonfuls of melted chocolate over it. Add the remaining cheesecake filling.
Tap the pan gently to settle.
- Create the marble effect: Use a thin knife or skewer to swirl the remaining melted chocolate through the top in gentle figure-eights. Don’t overmix—2–3 passes are enough for a clean pattern.
- Chill to set: Cover and refrigerate at least 6 hours, preferably overnight. The center should feel firm to the touch.
- Release and garnish: Run a thin knife around the inside edge of the pan, then unclasp the ring.
Slide onto a serving plate. Add chocolate shavings or berries if you like. Slice with a hot, dry knife for clean edges.
How to Store
- Refrigerate: Keep covered in the fridge for up to 4 days.
The crust stays crispest during the first two days.
- Freeze: Freeze whole or in slices for up to 1 month. Wrap tightly in plastic, then foil. Thaw overnight in the fridge before serving.
- Make ahead: This is a great day-before dessert.
The flavor improves as it chills.

Why This is Good for You
- Portion control is easy: A small slice is satisfying due to the rich, creamy texture.
- Less sugar than you think: Dark chocolate adds deep flavor, so you can keep the filling moderately sweet without feeling deprived.
- No oven heat: Ideal for warm days or busy kitchens, and you avoid the stress of baked cheesecake techniques.
- Customizable ingredients: You can use better-quality chocolate, organic dairy, or gluten-free cookies for the crust to meet your needs.
Pitfalls to Watch Out For
- Overheating the chocolate: If it’s too hot, it can melt the filling and ruin the swirl. Let it cool until just warm.
- Skipping the chill time: The cheesecake needs several hours to set. Cutting early leads to messy slices.
- Cold cream cheese: If not softened, it turns lumpy.
Bring it to room temperature before mixing.
- Over-swirl: Too much swirling blends the chocolate into the filling and loses the marbled look.
- Watered-down gelatin: Don’t add undissolved or hot gelatin directly. Bloom, melt gently, and cool for a smooth set.
Alternatives
- Gluten-free crust: Use gluten-free graham crackers or almond flour (1 1/2 cups) with 5 tablespoons butter and 2 tablespoons sugar.
- Chocolate cookie crust: Swap graham crackers for chocolate wafer cookies or Oreos (filling included). Reduce added sugar slightly.
- Sweeteners: Use superfine sugar or a powdered sugar substitute designed for baking.
Adjust to taste.
- Flavor twists: Add 1 teaspoon instant espresso to the melted chocolate, or 1/2 teaspoon almond extract to the filling.
- Topping ideas: Salted caramel drizzle, toasted hazelnuts, raspberries, or a dusting of cocoa.
- Vegetarian set without gelatin: Use agar-agar powder (about 1/2 teaspoon bloomed and simmered in 2 tablespoons water). Cool before adding.
FAQ
Can I make this without gelatin?
Yes. Fold the whipped cream carefully and chill overnight for a softer but sliceable set.
For extra hold, use 1 tablespoon cornstarch mixed with the powdered sugar, or try a small amount of agar-agar.
What kind of chocolate works best?
Dark or semi-sweet chocolate between 55% and 70% cocoa gives a clean, balanced taste. Milk chocolate is sweeter and softer, so reduce added sugar slightly if you use it.
How do I prevent a soggy crust?
Pack the crumbs firmly and chill the crust before adding the filling. If you want extra insurance, melt 2 ounces of chocolate and brush a thin layer over the crust, then chill to create a moisture barrier.
Can I use a hand mixer instead of a stand mixer?
Absolutely.
A hand mixer works well for both the cream cheese and the whipped cream. Just keep speeds moderate and scrape the bowl often for a smooth texture.
How long should I chill it?
At least 6 hours, but overnight is best. The flavor deepens and the structure becomes easier to slice cleanly.
Can I make mini cheesecakes?
Yes.
Press crust into lined muffin tins, add filling, swirl chocolate, and chill. Start checking set around 3–4 hours since smaller portions chill faster.
What if my filling looks grainy?
Graininess comes from cold cream cheese or overheated gelatin. Make sure the cream cheese is fully softened and the gelatin is cooled to room temperature before adding.
Blend just until smooth.
How do I get neat slices?
Use a sharp knife dipped in hot water and wiped dry between cuts. Don’t rush; clean the blade after every slice for crisp edges.
Final Thoughts
This no bake chocolate swirl cheesecake gives you the best of both worlds: bakery-level looks with home-cook ease. The creamy filling, balanced sweetness, and elegant marbling make it a reliable dessert for any occasion.
Once you learn the simple swirl technique and give it enough chill time, it’s practically foolproof. Keep this recipe handy for holidays, birthdays, or whenever you want a standout treat without turning on the oven.
Printable Recipe Card
Want just the essential recipe details without scrolling through the article? Get our printable recipe card with just the ingredients and instructions.