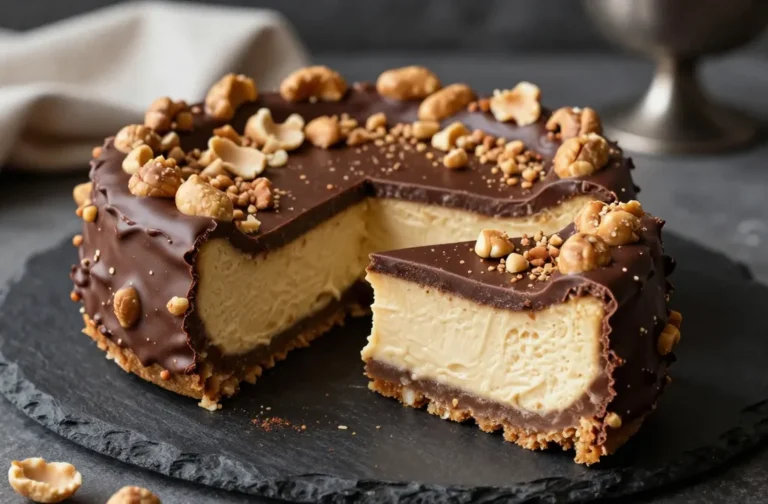
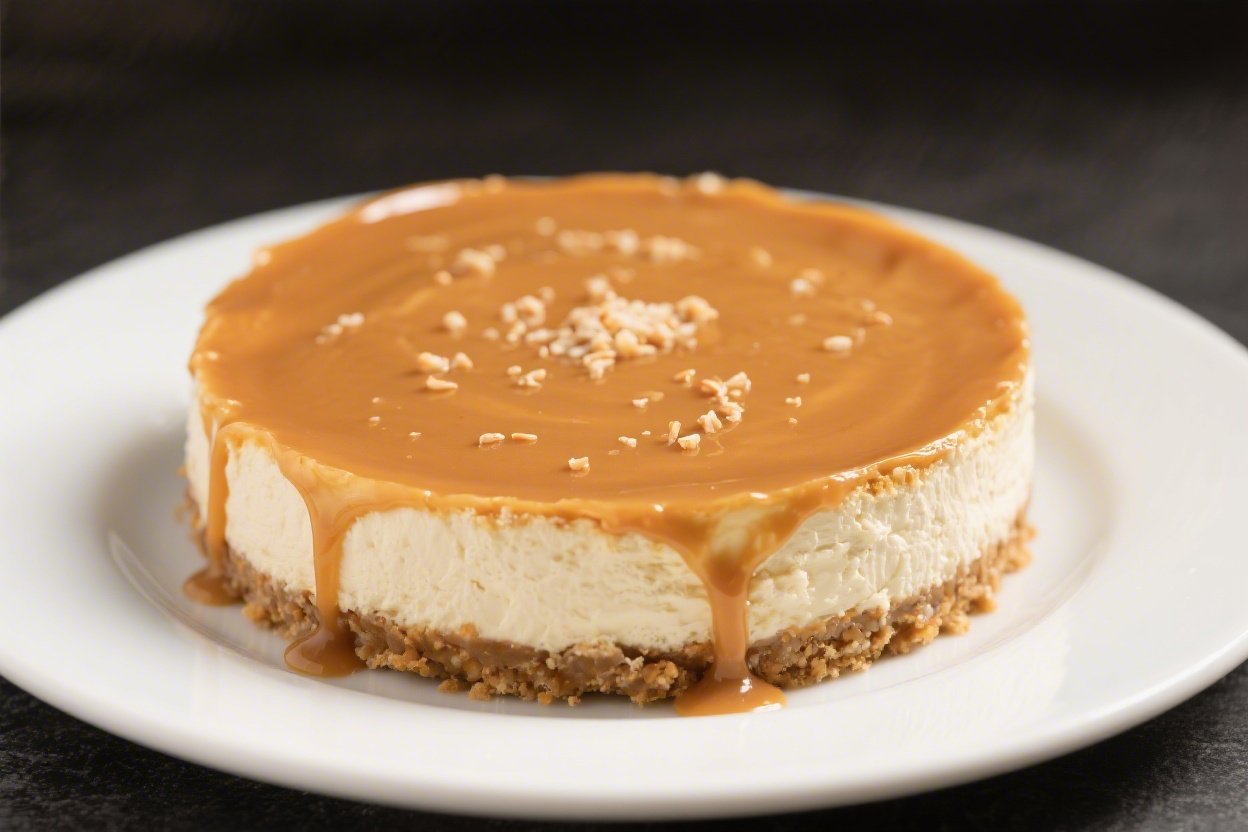
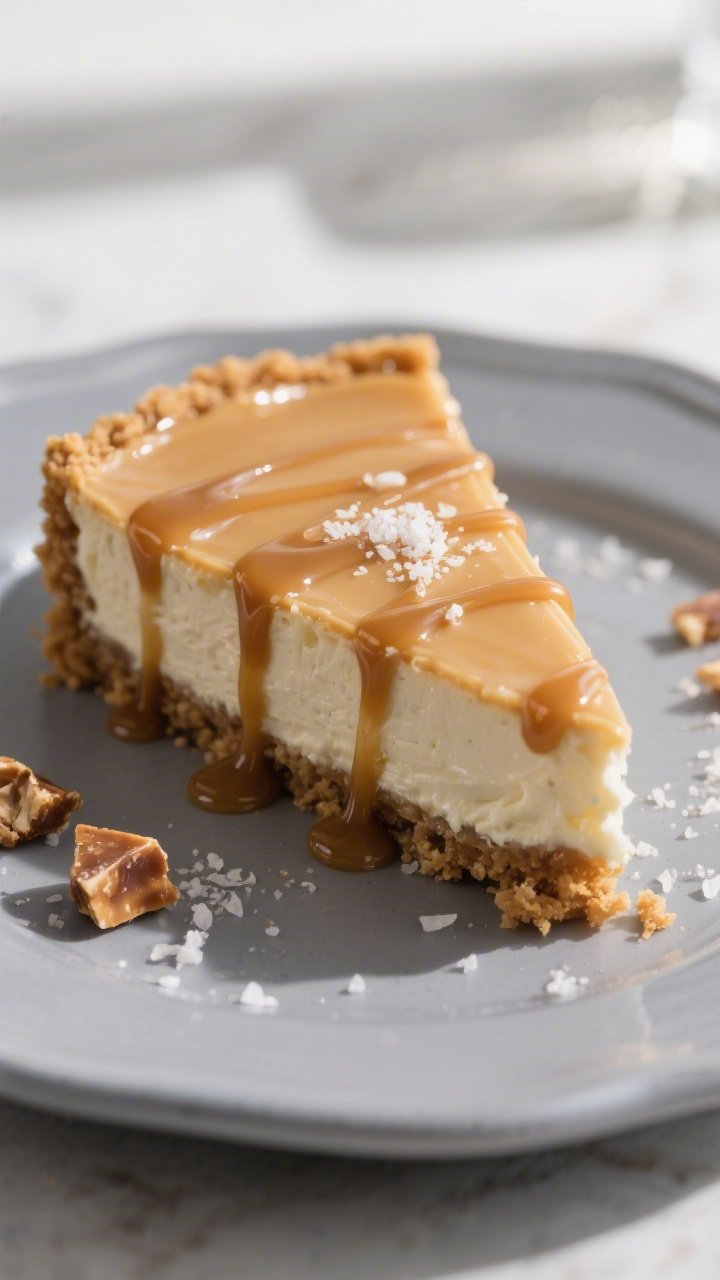
No Bake Salted Caramel Cheesecake – Creamy, Sweet, and Effortless
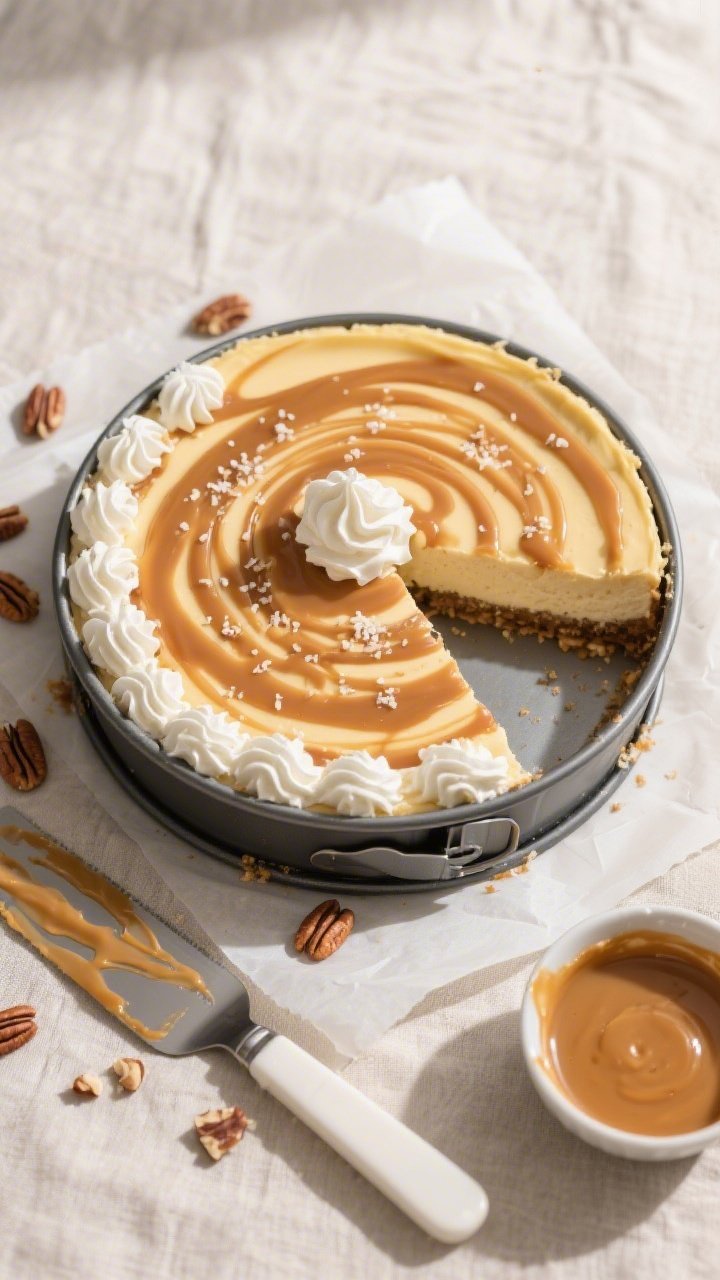
This is the kind of dessert that makes people think you spent all day in the kitchen, when you really didn’t. A no bake salted caramel cheesecake is lush, creamy, and full of sweet-salty contrast, all without turning on the oven. The texture lands somewhere between mousse and traditional cheesecake, with a buttery cookie crust that holds it all together.
FREE 7-Day Easy Dinner Reset
Get 7 healthy, family-friendly dinners complete with recipes and simple meal plans delivered straight to your inbox.
It’s simple enough for a weeknight treat, yet classy enough for holidays and dinner parties.
Ingredients
Method
- Prepare the pan: Lightly grease the bottom and sides of a 9-inch springform pan or line the base with parchment for easy removal.
- Make the crust: In a bowl, stir together the cookie crumbs, melted butter, sugar (if using), and a small pinch of salt until the mixture resembles wet sand. It should clump when pressed.
- Press and chill: Pour the crumb mixture into the pan and press firmly into an even layer, going slightly up the sides. Use the bottom of a measuring cup to pack it tight. Chill in the fridge for at least 20 minutes.
- Beat the cream cheese: In a large bowl, beat the softened cream cheese and 3/4 cup powdered sugar on medium speed until smooth and fluffy, about 2–3 minutes. Scrape the bowl well.
- Flavor the base: Beat in the vanilla and 1/2 cup salted caramel sauce until evenly combined. Taste and adjust sweetness if needed.
- Whip the cream: In a separate bowl, whip the cold heavy cream with 1/4 cup powdered sugar until medium-stiff peaks form. Don’t overbeat—stop when the cream holds its shape.
- Fold it together: Gently fold the whipped cream into the cream cheese mixture in two additions, using a spatula. Keep it airy by folding, not stirring.
- Season with salt: Add fine sea salt to taste, starting with 1/4 teaspoon and adding more if you like a stronger salted caramel profile. The salt should brighten the caramel, not dominate it.
- Fill the crust: Spoon the filling into the chilled crust and smooth the top. Tap the pan lightly on the counter to release air pockets.
- Chill to set: Cover and refrigerate for at least 6 hours, preferably overnight. The longer it chills, the cleaner the slices.
- Finish and serve: Just before serving, loosen the pan’s sides with a thin knife and release the springform. Drizzle with extra caramel and sprinkle with flaky sea salt. Add whipped cream and toffee or nuts if you like crunch.
What Makes This Special
This cheesecake brings together two crowd-pleasers: silky cream cheese and rich salted caramel. The no-bake method keeps things light, airy, and stress-free, especially in warmer months. A pinch of salt cuts through the sweetness and sharpens the caramel flavor, making each bite more interesting.
Plus, you can make it ahead, which means one less thing to juggle before guests arrive.
What You’ll Need
- For the crust:
- 2 cups (200 g) graham cracker crumbs or digestive biscuit crumbs
- 1/2 cup (115 g) unsalted butter, melted
- 2 tablespoons granulated sugar (optional, for extra sweetness)
- Pinch of fine sea salt
- For the filling:
- 24 oz (680 g) full-fat cream cheese, softened to room temperature
- 3/4 cup (90 g) powdered sugar
- 1 teaspoon pure vanilla extract
- 1/2 cup (120 ml) salted caramel sauce, plus more for topping
- 1 cup (240 ml) cold heavy whipping cream
- 1/4 cup (30 g) powdered sugar (for whipping cream)
- 1/2 teaspoon fine sea salt or flaky salt, to taste
- For topping (optional but recommended):
- Extra salted caramel sauce
- Flaky sea salt
- Whipped cream
- Crushed toffee bits or chopped toasted pecans
- Equipment:
- 9-inch (23 cm) springform pan
- Mixing bowls
- Hand mixer or stand mixer
- Rubber spatula
How to Make It
- Prepare the pan: Lightly grease the bottom and sides of a 9-inch springform pan or line the base with parchment for easy removal.
- Make the crust: In a bowl, stir together the cookie crumbs, melted butter, sugar (if using), and a small pinch of salt until the mixture resembles wet sand. It should clump when pressed.
- Press and chill: Pour the crumb mixture into the pan and press firmly into an even layer, going slightly up the sides. Use the bottom of a measuring cup to pack it tight.
Chill in the fridge for at least 20 minutes.
- Beat the cream cheese: In a large bowl, beat the softened cream cheese and 3/4 cup powdered sugar on medium speed until smooth and fluffy, about 2–3 minutes. Scrape the bowl well.
- Flavor the base: Beat in the vanilla and 1/2 cup salted caramel sauce until evenly combined. Taste and adjust sweetness if needed.
- Whip the cream: In a separate bowl, whip the cold heavy cream with 1/4 cup powdered sugar until medium-stiff peaks form.
Don’t overbeat—stop when the cream holds its shape.
- Fold it together: Gently fold the whipped cream into the cream cheese mixture in two additions, using a spatula. Keep it airy by folding, not stirring.
- Season with salt: Add fine sea salt to taste, starting with 1/4 teaspoon and adding more if you like a stronger salted caramel profile. The salt should brighten the caramel, not dominate it.
- Fill the crust: Spoon the filling into the chilled crust and smooth the top.
Tap the pan lightly on the counter to release air pockets.
- Chill to set: Cover and refrigerate for at least 6 hours, preferably overnight. The longer it chills, the cleaner the slices.
- Finish and serve: Just before serving, loosen the pan’s sides with a thin knife and release the springform. Drizzle with extra caramel and sprinkle with flaky sea salt.
Add whipped cream and toffee or nuts if you like crunch.
How to Store
Keep the cheesecake covered in the fridge for up to 4 days. Add caramel and flaky salt right before serving to keep the top neat and glossy. For longer storage, freeze slices on a sheet pan until solid, then wrap well.
They’ll keep for up to 2 months. Thaw in the fridge overnight for the best texture.
Benefits of This Recipe
- No oven needed: Great for warm weather or busy days.
- Make-ahead friendly: Sets in the fridge, so your dessert is ready when you are.
- Balanced flavor: The salted caramel keeps the sweetness in check.
- Customizable: Change the crust, toppings, or level of salt to suit your crowd.
- Beginner-friendly: Straightforward steps with a forgiving texture.
What Not to Do
- Don’t use low-fat cream cheese: It won’t set as well and can taste chalky.
- Don’t skip room temperature cream cheese: Cold cream cheese leads to lumps.
- Don’t rush the chill time: Under-chilled cheesecake won’t slice cleanly.
- Don’t overwhip the cream: Overbeaten cream turns grainy and ruins the texture.
- Don’t over-salt: Start small and taste as you go. You can always add more.
Variations You Can Try
- Chocolate cookie crust: Use chocolate sandwich cookies (cream and all) for a deeper, brownie-like base.
- Espresso swirl: Stir 1–2 teaspoons instant espresso into the caramel for a coffee-kissed cheesecake.
- Apple pie topping: Spoon warm cinnamon apples over each slice, then drizzle with caramel.
- Pretzel crust: Swap half the graham crumbs for crushed pretzels for extra salt and crunch.
- Bourbon caramel: Add 1–2 teaspoons bourbon to your caramel sauce for a cozy, grown-up twist.
- Mini cheesecakes: Press crust into a lined muffin tin and fill; chill 3–4 hours for individual servings.
FAQ
Can I use store-bought caramel sauce?
Never Wonder What's For Dinner Again
Get 7 healthy, family-friendly dinners complete with recipes, grocery lists, and simple meal plans delivered straight to your inbox.
Yes.
Use a good-quality, thick caramel sauce so the flavor stands out and the filling doesn’t loosen. If your sauce is thin, simmer it briefly to reduce and thicken before cooling and using.
How do I avoid a soggy crust?
Pack the crust firmly and chill it before adding the filling. If your kitchen is warm or you like a very firm base, bake the crust at 350°F (175°C) for 8 minutes, then cool completely.
It’s still mostly “no bake,” but the crust will be sturdier.
What if I don’t have a springform pan?
Use a deep pie dish or an 8- or 9-inch square pan lined with parchment. You’ll slice and lift squares rather than unmolding a whole round cheesecake.
Can I make it less sweet?
Reduce the powdered sugar in the filling by 2–3 tablespoons and use a lightly salted caramel. Taste as you go.
You can also increase the salt slightly to balance the sweetness without making it salty.
Why is my filling runny?
Common causes are under-whipped cream, warm or low-fat cream cheese, or too much liquid caramel. Make sure the whipped cream reaches medium-stiff peaks, the cream cheese is full-fat, and the caramel is thick and cooled before mixing.
How long should it chill?
Plan for at least 6 hours, but overnight is ideal. If you’re making minis, 3–4 hours is usually enough.
The colder it is, the cleaner the slices.
Can I make it gluten-free?
Yes. Use gluten-free graham crackers or cookies and double-check your caramel and vanilla for gluten-free labeling. The filling itself is naturally gluten-free.
What salt works best?
Use fine sea salt in the filling for even seasoning, and finish with flaky sea salt on top for texture.
Avoid table salt in the filling—it can taste harsh.
Can I add gelatin to help it set?
You can, but it’s optional. If you want extra firmness, bloom 1 teaspoon powdered gelatin in 1 tablespoon cold water, melt gently, cool slightly, and mix into the caramel-cheesecake base before folding in the whipped cream.
How far ahead can I make it?
Make it up to 2 days ahead. Add the caramel drizzle and flaky salt right before serving to keep it picture-perfect.
In Conclusion
This no bake salted caramel cheesecake is rich, smooth, and surprisingly easy.
With a buttery crust, silky filling, and a glossy caramel finish, it checks every dessert box. Make it ahead, keep it chilled, and bring it out when you’re ready to impress—no oven, no stress, just a guaranteed crowd-pleaser.
Printable Recipe Card
Want just the essential recipe details without scrolling through the article? Get our printable recipe card with just the ingredients and instructions.
Loved This Recipe?
If you're looking for more simple, healthy dinners your family will actually eat, grab my FREE 7-Day Easy Dinner Reset. You'll get 7 easy dinner recipes, simple grocery lists, and a done-for-you plan that takes the stress out of mealtime.