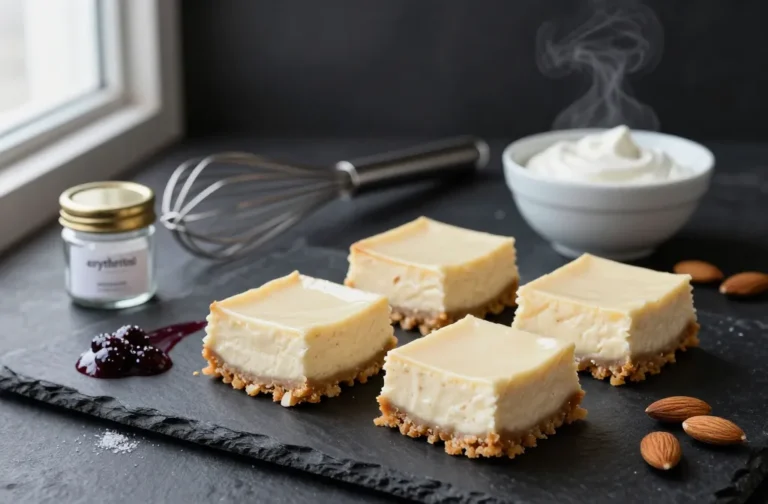
No Bake Coffee Cheesecake – Creamy, Simple, and Full of Flavor
This no bake coffee cheesecake is the kind of dessert that makes people pause after the first bite. It’s silky, rich, and balanced with a gentle coffee kick that tastes like a fancy café treat. No oven.
No water bath. No fuss. If you love coffee and you love cheesecake, this is the sweet spot.
Make it ahead for a dinner party, a weekend treat, or anytime you need something special without turning on the oven.
Ingredients
Method
- Prep the pan: Line the bottom of a 9-inch (23 cm) springform pan with parchment. Lightly grease the sides for a cleaner release.
- Make the crust: Stir cookie crumbs, melted butter, sugar (if using), and salt until evenly moistened. Press firmly into the pan, going slightly up the sides. Use the bottom of a measuring cup to compact it well. Chill while you make the filling.
- Dissolve the coffee: Mix instant espresso with hot water until smooth. Let it cool to lukewarm. This ensures even flavor without melting the filling.
- Optional gelatin step: Sprinkle gelatin over cold water and let it bloom for 5 minutes. Microwave for 10–15 seconds until just melted, or warm gently on the stove. Cool slightly before adding later. This helps the cheesecake hold extra-firm slices, especially in warm climates.
- Beat the cream cheese: In a large bowl, beat cream cheese, powdered sugar, vanilla, and salt until completely smooth and fluffy. Scrape the bowl so there are no lumps.
- Add the coffee: Beat in the cooled dissolved coffee. Taste and adjust coffee strength. For a bolder flavor, add another 1/2–1 tsp espresso powder, dissolved.
- Whip the cream: In a separate bowl, whip cold heavy cream to medium-stiff peaks. Don’t overbeat. You want it cloud-like but stable.
- Combine: Gently fold the whipped cream into the coffee-cream cheese mixture in two additions. If using gelatin, whisk a few spoonfuls of the cheesecake mixture into the melted gelatin to temper it, then fold that back into the main bowl.
- Fill the pan: Spoon the filling over the chilled crust. Smooth the top with an offset spatula. Tap the pan gently to release any air bubbles.
- Chill: Cover and refrigerate at least 6 hours, but overnight is best for a clean slice and fully developed flavor.
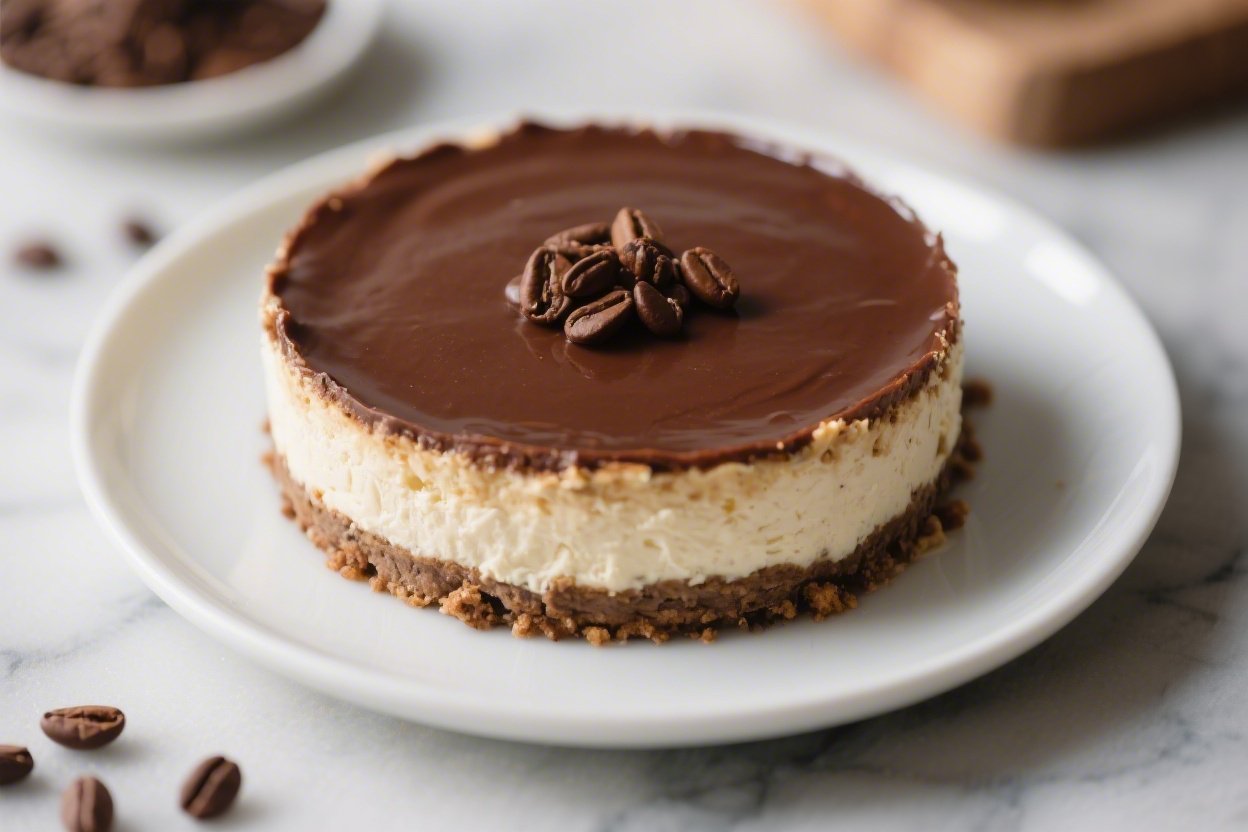
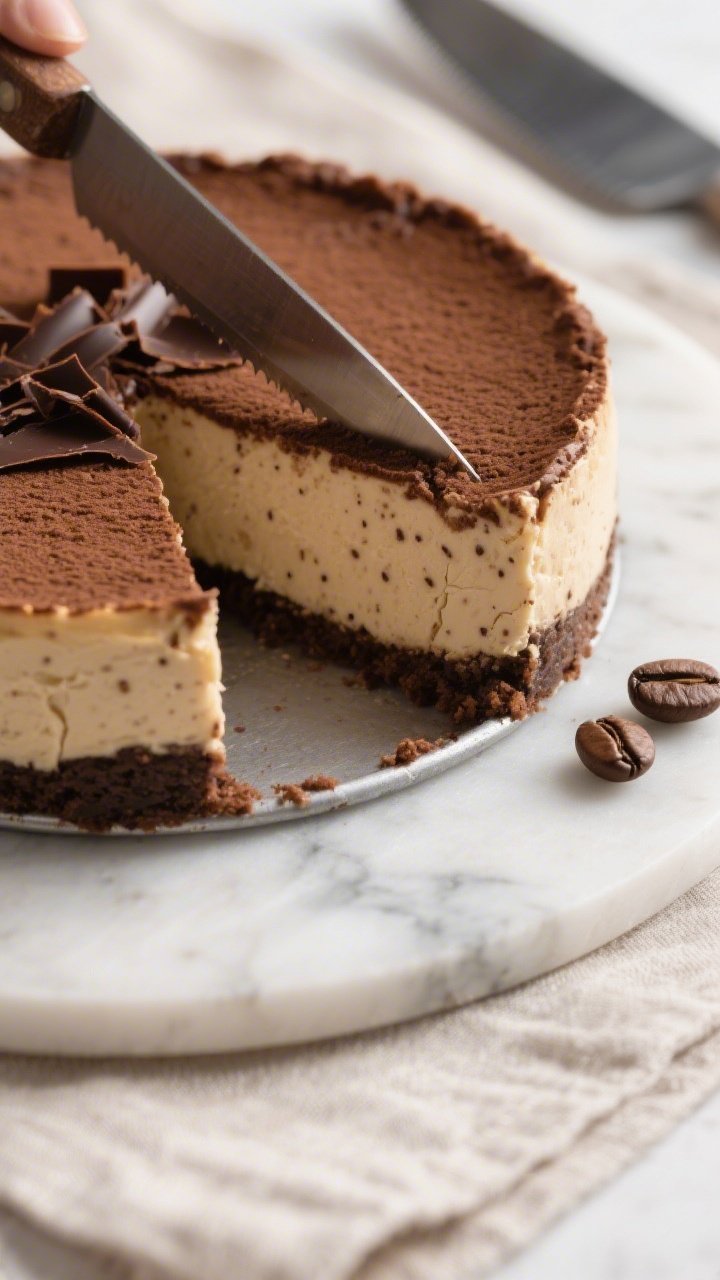
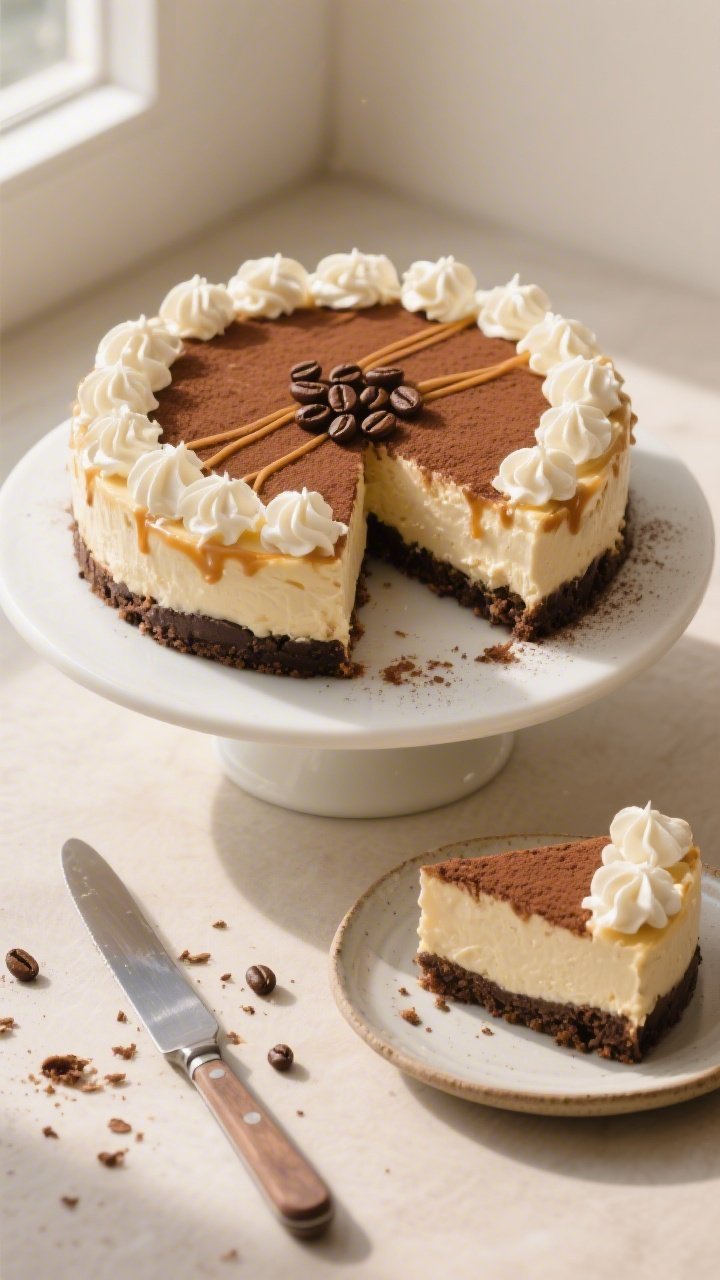
- Serve: Run a thin knife around the edge and release the springform. Dust with cocoa, add chocolate shavings, or pipe whipped cream. Slice with a hot, dry knife for the neatest edges.

What Makes This Recipe So Good
- No baking required: The refrigerator does all the work. Perfect for warm days or when you need a low-effort dessert.
- Ultra-creamy texture: Whipped cream lightens the filling, while cream cheese keeps it rich and smooth.
- Bold coffee flavor: Instant espresso or strong instant coffee brings depth without bitterness.
- Foolproof crust: A classic cookie-and-butter base holds together well and adds a satisfying crunch.
- Make-ahead friendly: It sets best overnight, so you can prep it in advance and relax on the day you serve.
Ingredients
- For the crust:
- 200 g (about 7 oz) chocolate or plain digestive biscuits/graham crackers, crushed
- 80 g (6 tbsp) unsalted butter, melted
- 1 tbsp granulated sugar (optional, skip if using sweet cookies)
- 1 pinch fine sea salt
- For the filling:
- 500 g (18 oz) full-fat cream cheese, room temperature
- 120 g (1 cup) powdered sugar, sifted
- 1 tsp pure vanilla extract
- 250 ml (1 cup) cold heavy cream/whipping cream
- 2–3 tsp instant espresso powder (or 1–1.5 tbsp instant coffee), to taste
- 2 tbsp hot water, to dissolve the coffee
- 1 tsp unflavored powdered gelatin + 1.5 tbsp cold water (optional, for a firmer set)
- 1 pinch fine sea salt
- For topping (optional):
- Cocoa powder or finely grated dark chocolate
- Chocolate-covered espresso beans
- Lightly sweetened whipped cream
- Caramel or chocolate drizzle
Instructions
- Prep the pan: Line the bottom of a 9-inch (23 cm) springform pan with parchment. Lightly grease the sides for a cleaner release.
- Make the crust: Stir cookie crumbs, melted butter, sugar (if using), and salt until evenly moistened.
Press firmly into the pan, going slightly up the sides. Use the bottom of a measuring cup to compact it well. Chill while you make the filling.
- Dissolve the coffee: Mix instant espresso with hot water until smooth.
Let it cool to lukewarm. This ensures even flavor without melting the filling.
- Optional gelatin step: Sprinkle gelatin over cold water and let it bloom for 5 minutes. Microwave for 10–15 seconds until just melted, or warm gently on the stove.
Cool slightly before adding later. This helps the cheesecake hold extra-firm slices, especially in warm climates.
- Beat the cream cheese: In a large bowl, beat cream cheese, powdered sugar, vanilla, and salt until completely smooth and fluffy. Scrape the bowl so there are no lumps.
- Add the coffee: Beat in the cooled dissolved coffee. Taste and adjust coffee strength.
For a bolder flavor, add another 1/2–1 tsp espresso powder, dissolved.
- Whip the cream: In a separate bowl, whip cold heavy cream to medium-stiff peaks. Don’t overbeat. You want it cloud-like but stable.
- Combine: Gently fold the whipped cream into the coffee-cream cheese mixture in two additions.
If using gelatin, whisk a few spoonfuls of the cheesecake mixture into the melted gelatin to temper it, then fold that back into the main bowl.
- Fill the pan: Spoon the filling over the chilled crust. Smooth the top with an offset spatula. Tap the pan gently to release any air bubbles.
- Chill: Cover and refrigerate at least 6 hours, but overnight is best for a clean slice and fully developed flavor.
- Serve: Run a thin knife around the edge and release the springform.
Dust with cocoa, add chocolate shavings, or pipe whipped cream. Slice with a hot, dry knife for the neatest edges.
Keeping It Fresh
- Refrigerator: Cover tightly and keep chilled for up to 4 days. The crust stays crispest in the first 48 hours.
- Freezer: Freeze whole or in slices for up to 1 month.
Wrap well in plastic and foil. Thaw in the fridge overnight. The texture remains creamy, especially if you used gelatin.
- Avoid condensation: When removing from the fridge, wipe the inside of the cover or lid so moisture doesn’t drip onto the cheesecake.
Health Benefits
- Portion control is easy: A small slice satisfies thanks to the rich filling, helping you enjoy dessert mindfully.
- Calcium and protein: Cream cheese and cream provide calcium and some protein, which support bone health and satiety.
- Caffeine awareness: The coffee brings a mild energy lift.
You control the coffee level to suit your needs.
- Customizable sweetness: Using powdered sugar lets you fine-tune sweetness, and a darker chocolate crust can reduce added sugar slightly.
Common Mistakes to Avoid
- Using cold cream cheese: It won’t blend smoothly and can leave lumps. Bring it to room temperature first.
- Adding hot coffee: Heat melts the mixture and prevents a good set. Always cool the dissolved coffee.
- Overwhipping cream: Overbeaten cream turns grainy and heavy.
Stop at medium-stiff peaks.
- Skipping the chill time: The cheesecake needs several hours to firm up. Rushing leads to messy slices.
- Loose crust: If the crumbs aren’t well packed, the base will crumble. Press firmly and chill before adding the filling.
Variations You Can Try
- Mocha Swirl: Melt 60 g (2 oz) dark chocolate, cool it slightly, and swirl through half the filling before setting.
- Caramel Latte: Drizzle salted caramel over the crust before adding the filling and again on top before serving.
- Tiramisu-Inspired: Use ladyfinger crumbs for the crust, add a splash (1–2 tbsp) of Marsala or coffee liqueur to the filling, and dust with cocoa.
- Decaf Version: Swap in decaf espresso powder to enjoy the flavor with less caffeine.
- Greek Yogurt Lift: Replace 100 g (3.5 oz) of cream cheese with thick Greek yogurt for a lighter tang.
Drain the yogurt well first.
- Nutty Crunch: Stir 1/2 cup finely chopped toasted hazelnuts or almonds into the crust for texture and a roasty note.
FAQ
Can I use brewed coffee instead of instant espresso?
Brewed coffee adds water and can dilute the flavor. If that’s your only option, reduce it to a strong concentrate and cool completely before using. Instant espresso or high-quality instant coffee gives the best taste without extra liquid.
What if I don’t have a springform pan?
Use a deep 9-inch pie dish or an 8-inch square pan lined with a parchment sling.
Serve as squares or wedges. The first slice may be less perfect, but it will taste just as good.
How strong is the coffee flavor?
It’s pleasantly present, like a latte with a hint of mocha if you use a chocolate crust. For a bolder kick, add an extra teaspoon of espresso powder.
For subtle flavor, stick to the lower amount or use decaf.
Do I really need gelatin?
No. The cheesecake sets well without it if you chill it overnight. Gelatin simply adds extra stability for warmer rooms, long transport, or ultra-clean slices.
Why is my cheesecake grainy?
This usually means the cream cheese was too cold or the cream was overwhipped.
Next time, soften the cream cheese fully and stop whipping the cream at medium-stiff peaks. Folding gently also helps keep it silky.
Can I make this ahead?
Yes, and it’s even better the next day. Make it up to 2 days in advance and keep it covered in the fridge.
Add toppings just before serving for the freshest look.
How do I get clean slices?
Use a long, sharp knife dipped in hot water and wiped dry between cuts. Don’t rush. A gentle sawing motion helps keep the crust intact.
Final Thoughts
No bake coffee cheesecake is the kind of dessert that feels elegant without being complicated.
With a crunchy crust, a creamy coffee filling, and a make-ahead schedule that works with your life, it’s a reliable showstopper. Keep the ingredients simple, follow the chill time, and you’ll end up with a smooth, café-worthy slice every time. Add your favorite toppings, pour fresh coffee, and enjoy the moment.
Printable Recipe Card
Want just the essential recipe details without scrolling through the article? Get our printable recipe card with just the ingredients and instructions.