No Bake Cheesecake With Protein Powder – Creamy, Easy, and Satisfying
This no bake cheesecake with protein powder is smooth, creamy, and surprisingly light. It tastes like dessert but supports your goals, whether you’re aiming for more protein, a balanced snack, or a better-for-you treat. There’s no oven, no water bath, and no fuss.
FREE 7-Day Easy Dinner Reset
Get 7 healthy, family-friendly dinners complete with recipes and simple meal plans delivered straight to your inbox.
Just mix, chill, and enjoy. It’s perfect for weeknights, meal prep, or when you want something sweet without a sugar crash.
Ingredients
Method
- Prep the pan: Line the bottom of a 9-inch springform pan with parchment. Lightly grease the sides for easier release.
- Make the crust: In a bowl, mix crumbs, sugar, salt, and melted butter until it resembles wet sand. Press firmly into the pan, going 1 inch up the sides. Use the bottom of a glass to compact. Chill while you make the filling.
- Bloom the gelatin (optional): Sprinkle gelatin over 2 tablespoons of cold water in a small bowl. Let sit 5 minutes. Gently warm in the microwave for 10–15 seconds to dissolve. Cool slightly.
- Whip the cream: In a cold bowl, whip heavy cream to soft peaks. Set aside. This adds lift and a classic cheesecake texture.
- Beat the base: With a hand mixer, beat softened cream cheese until smooth and lump-free. Add Greek yogurt, sweetener, lemon juice, vanilla, and a pinch of salt. Beat until creamy and uniform.
- Add protein powder: Sprinkle protein powder in gradually, mixing on low to avoid clumps. Scrape the bowl as needed. The mixture should be thick but spreadable. If too stiff, add 1–2 tablespoons milk.
- Stabilize (if using gelatin): Mix a spoonful of the cheesecake batter into the dissolved gelatin, then pour that mixture back into the bowl and blend on low. This prevents streaks.
- Fold in whipped cream: Gently fold whipped cream into the batter with a spatula until just combined. Don’t overmix.
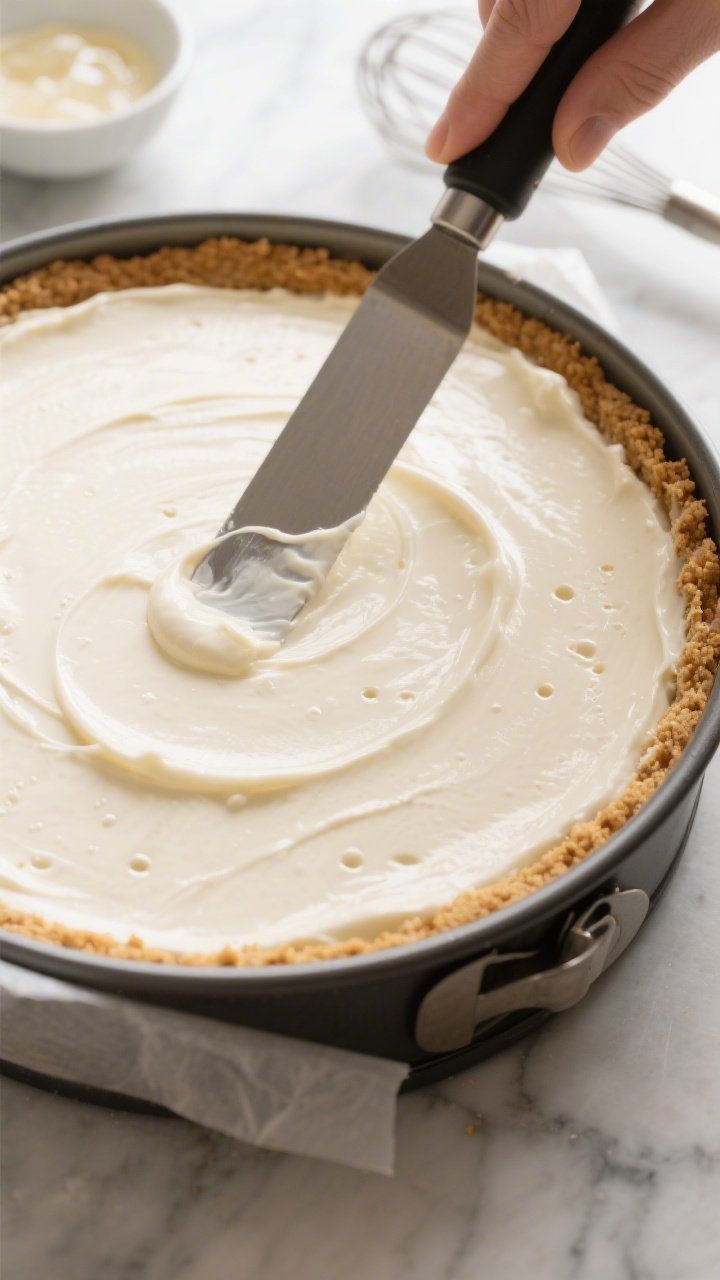
- Fill and smooth: Spoon filling over the chilled crust. Tap the pan gently on the counter to pop air bubbles. Smooth the top with an offset spatula.
- Chill: Cover and refrigerate for at least 6 hours, preferably overnight. The longer it chills, the cleaner it slices.
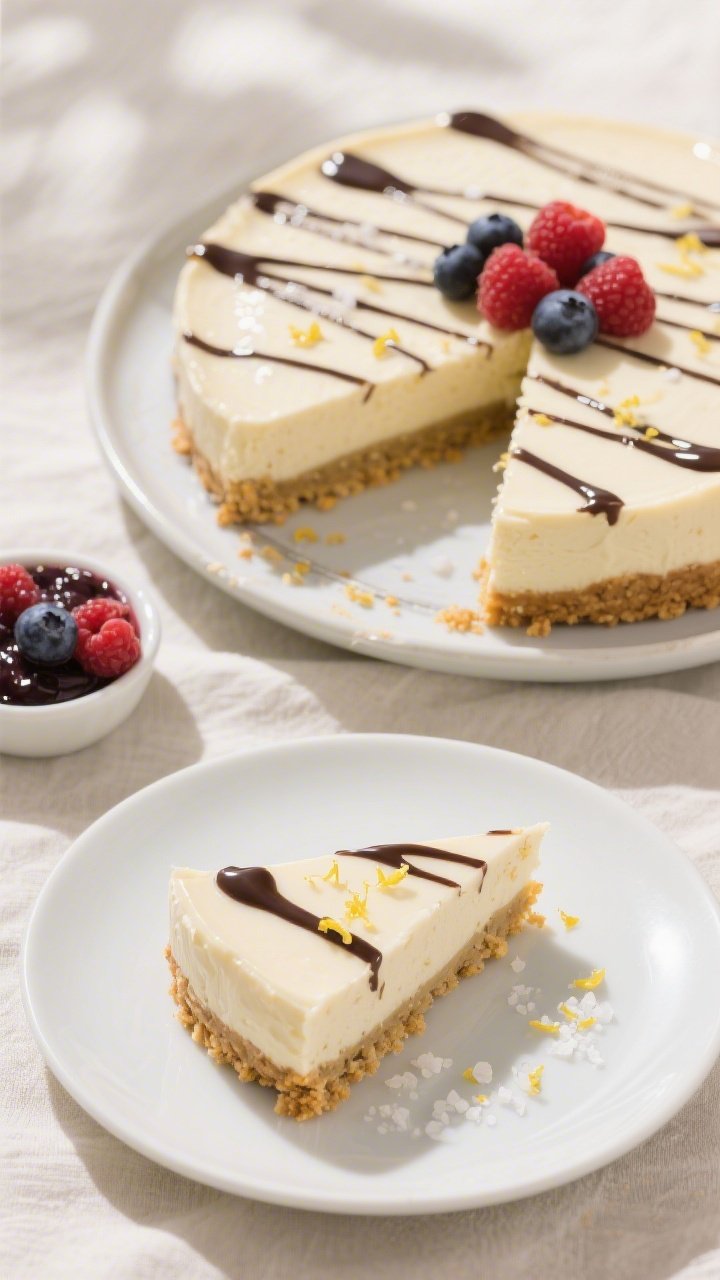
- Serve: Release from the springform pan. Top with berries or a light drizzle of chocolate. Slice with a hot, dry knife for crisp edges.
What Makes This Recipe So Good
- High protein without sacrificing flavor: The filling is rich and cheesecake-like, with a boost from protein powder.
- No oven required: Ideal for warm days or small kitchens. Chill time does the work.
- Customizable: Swap flavors, sweeteners, and crusts to suit your taste and dietary needs.
- Meal-prep friendly: Holds up well in the fridge for several days and slices cleanly.
- Balanced sweetness: Not cloying.
You can use honey, maple, or a zero-calorie sweetener.
Ingredients
- For the crust:
- 1 1/2 cups (150 g) graham cracker crumbs or digestive biscuit crumbs
- 3 tablespoons sugar or granulated sweetener
- 6 tablespoons (85 g) unsalted butter, melted
- Pinch of salt
- For the filling:
- 16 oz (450 g) full-fat cream cheese, softened
- 1 cup (240 g) plain Greek yogurt (2% or full-fat)
- 1/2 cup (120 ml) heavy cream or canned coconut cream
- 2/3 cup (70–90 g) vanilla whey or casein protein powder (see notes)
- 1/3–1/2 cup (65–100 g) sugar, honey, maple syrup, or granulated sweetener to taste
- 1 tablespoon lemon juice
- 2 teaspoons vanilla extract
- 1 teaspoon unflavored powdered gelatin (optional but recommended)
- 2 tablespoons cold water (for blooming gelatin, if using)
- Pinch of salt
- Optional toppings: Fresh berries, a light drizzle of melted dark chocolate, or a simple berry compote
Step-by-Step Instructions
- Prep the pan: Line the bottom of a 9-inch springform pan with parchment. Lightly grease the sides for easier release.
- Make the crust: In a bowl, mix crumbs, sugar, salt, and melted butter until it resembles wet sand. Press firmly into the pan, going 1 inch up the sides.
Use the bottom of a glass to compact. Chill while you make the filling.
- Bloom the gelatin (optional): Sprinkle gelatin over 2 tablespoons of cold water in a small bowl. Let sit 5 minutes.
Gently warm in the microwave for 10–15 seconds to dissolve. Cool slightly.
- Whip the cream: In a cold bowl, whip heavy cream to soft peaks. Set aside.
This adds lift and a classic cheesecake texture.
- Beat the base: With a hand mixer, beat softened cream cheese until smooth and lump-free. Add Greek yogurt, sweetener, lemon juice, vanilla, and a pinch of salt. Beat until creamy and uniform.
- Add protein powder: Sprinkle protein powder in gradually, mixing on low to avoid clumps.
Scrape the bowl as needed. The mixture should be thick but spreadable. If too stiff, add 1–2 tablespoons milk.
- Stabilize (if using gelatin): Mix a spoonful of the cheesecake batter into the dissolved gelatin, then pour that mixture back into the bowl and blend on low.
This prevents streaks.
- Fold in whipped cream: Gently fold whipped cream into the batter with a spatula until just combined. Don’t overmix.
- Fill and smooth: Spoon filling over the chilled crust. Tap the pan gently on the counter to pop air bubbles.
Smooth the top with an offset spatula.
- Chill: Cover and refrigerate for at least 6 hours, preferably overnight. The longer it chills, the cleaner it slices.
- Serve: Release from the springform pan. Top with berries or a light drizzle of chocolate.
Slice with a hot, dry knife for crisp edges.
Keeping It Fresh
- Refrigeration: Store covered for 4–5 days. Keep toppings separate to prevent sogginess.
- Freezing: Freeze individual slices on a sheet pan, then wrap tightly. Best within 1 month.
Thaw in the fridge overnight.
- Moisture control: Place a paper towel under the lid to catch condensation if your fridge runs humid.
Benefits of This Recipe
- Protein-packed treat: A slice delivers meaningful protein, especially with whey or casein, helping with satiety and recovery.
- Flexible sweetness: Adjust sugar to your preference or use a zero-calorie option without affecting structure much.
- Lower effort, high payoff: No baking stress. It looks impressive for gatherings and requires basic tools.
- Custom macros: Swap yogurt fat level, choose your protein powder, and control the crust for your goals.
Pitfalls to Watch Out For
- Clumpy protein powder: Add it slowly and mix on low. If lumps appear, whisk separately with a few tablespoons of milk before adding.
- Too firm or too loose: Whey tends to make a softer set; casein thickens more.
Adjust with 1–2 tablespoons extra cream for casein, or use the optional gelatin for whey.
- Grainy texture: Ensure cream cheese is truly softened before beating. Cold cream cheese resists smoothing.
- Wet crust: Pack the crumbs firmly and chill. If using a liquid sweetener in the crust, add an extra tablespoon of crumbs to compensate.
- Over-sweetening: Protein powders vary in sweetness.
Taste as you go and reduce added sugar if your powder is sweet.
Alternatives
- Crust swaps: Try chocolate wafer crumbs, almond flour with a bit of butter and sweetener, or a no-crust option in jars.
- Dairy-free: Use dairy-free cream cheese, coconut yogurt, and coconut cream. Choose a plant-based protein like pea blend. Texture may be slightly denser.
- Flavor twists: Use chocolate protein powder and add 2 tablespoons cocoa.
Or go lemon by adding extra zest and swapping vanilla powder for unflavored.
- Individual cups: Press crust into small jars, pipe in filling, and chill. Great for portion control and quick serving.
- Lower-fat: Use 1/3 less-fat cream cheese and 2% Greek yogurt. The texture will be lighter; consider the gelatin to help set.
FAQ
Never Wonder What's For Dinner Again
Get 7 healthy, family-friendly dinners complete with recipes, grocery lists, and simple meal plans delivered straight to your inbox.
What type of protein powder works best?
Whey or a whey-casein blend gives a creamy texture and clean flavor.
Casein thickens more and sets firmer. Plant-based powders can work but may taste earthier and may need an extra tablespoon of sweetener and a splash more cream for smoothness.
Can I skip the gelatin?
Yes. The cheesecake will still set, especially with casein or a blend.
If using whey only, gelatin helps you get neat slices. Without it, plan on a slightly softer but still delicious texture.
How do I prevent a chalky taste?
Use a protein powder you enjoy in shakes. Balance with lemon juice and vanilla, and don’t overpack the powder.
Start with 2/3 cup and adjust next time to suit your brand.
Can I make it sugar-free?
Absolutely. Use a granular, cup-for-cup sweetener like erythritol or allulose. Allulose keeps the texture silky and avoids cooling aftertaste.
Adjust to taste since protein powders differ in sweetness.
How long should it chill?
Six hours is the minimum for clean slices. Overnight is ideal. If you’re in a rush, make individual cups, which set faster—about 3–4 hours.
Will Greek yogurt make it tangy?
A little, in a good way.
It brightens the flavor like a classic cheesecake. If you prefer less tang, use plain Icelandic skyr or a milder yogurt and add a touch more vanilla.
Can I use flavored cream cheese?
You can, but check sweetness and salt. Many flavored spreads are softer, so consider the gelatin to make sure it sets well.
Final Thoughts
This no bake cheesecake with protein powder gives you the best of both worlds: a creamy, classic dessert feel with a smart protein boost.
It’s easy to adapt, easy to love, and easy to share. Keep the method simple, taste as you go, and let the fridge do the work. Once you’ve got the base down, play with flavors and toppings—this is a recipe you’ll return to again and again.
Printable Recipe Card
Want just the essential recipe details without scrolling through the article? Get our printable recipe card with just the ingredients and instructions.
Loved This Recipe?
If you're looking for more simple, healthy dinners your family will actually eat, grab my FREE 7-Day Easy Dinner Reset. You'll get 7 easy dinner recipes, simple grocery lists, and a done-for-you plan that takes the stress out of mealtime.