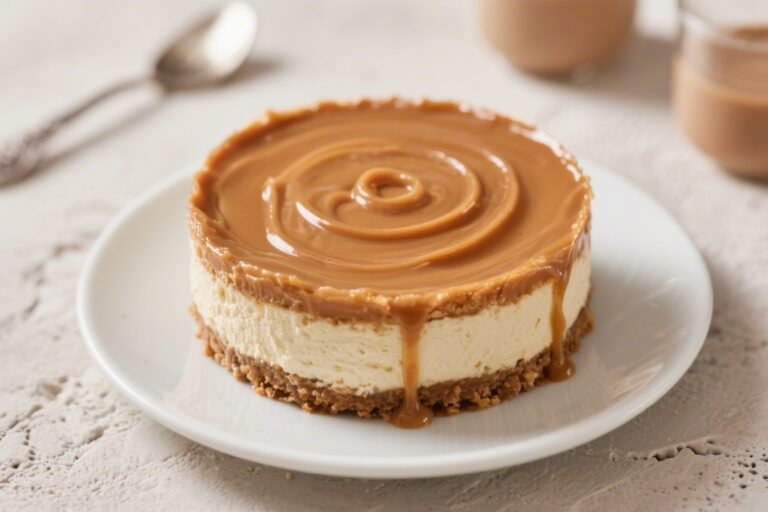
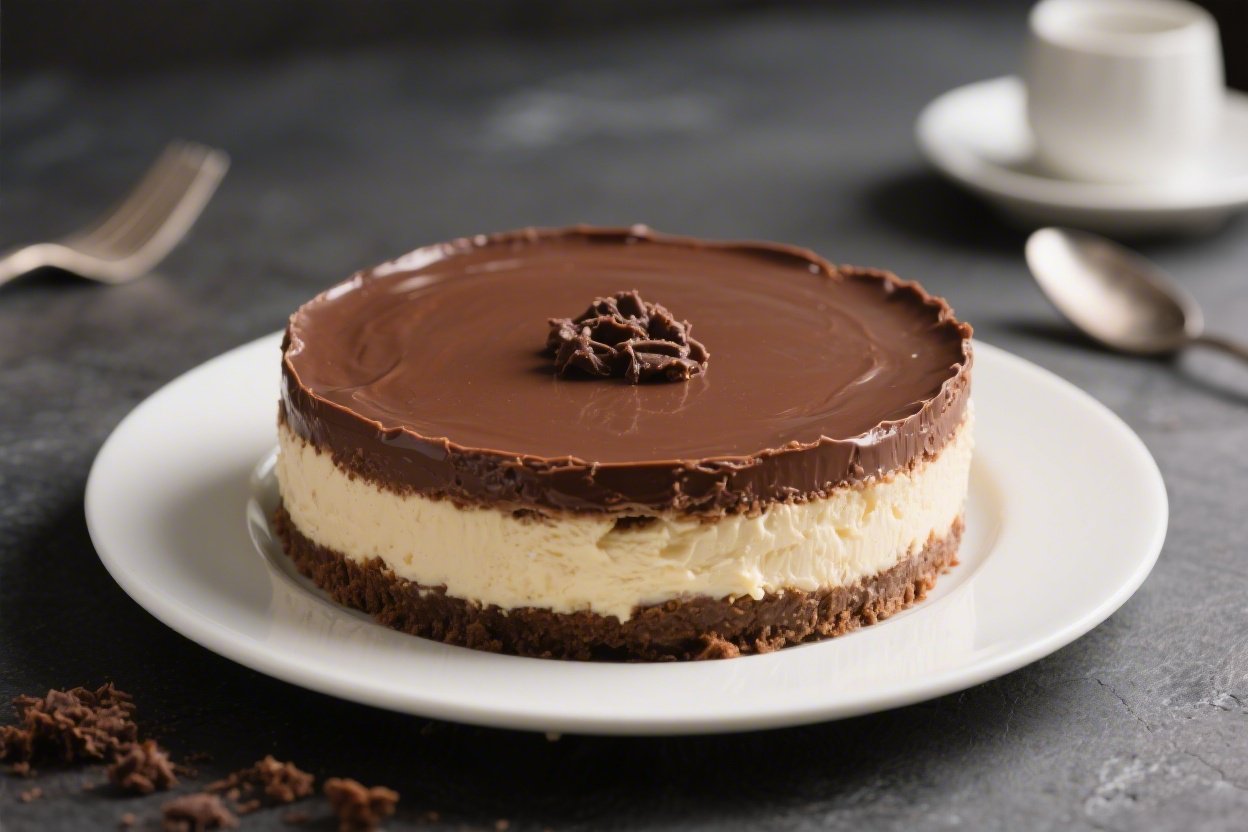
No Bake Chocolate Cheesecake – Rich, Creamy, and Effortless
You don’t need an oven to make a show-stopping dessert. This no bake chocolate cheesecake is silky, deeply chocolatey, and comes together with simple ingredients you probably already have. The texture is smooth and creamy, with a crunchy cookie crust that balances the richness.
It’s the kind of dessert that makes people think you spent hours in the kitchen, but it’s actually quick and easy. Perfect for holidays, birthdays, or a casual weekend treat.
Ingredients
Method
- Prepare the pan: Line the bottom of a 9-inch springform pan with parchment paper. Lightly grease the sides if you like cleaner releases.
- Make the crust: In a bowl, combine the crushed cookies, melted butter, sugar, and a pinch of salt. Mix until the crumbs feel like wet sand and hold together when pressed.
- Press and chill: Firmly press the crumb mixture into the bottom of the pan and slightly up the sides. Use a flat-bottom glass to compact it. Refrigerate while you make the filling.
- Melt the chocolate: Place the chopped chocolate in a heat-safe bowl. Microwave in 20–30 second bursts, stirring between each, until smooth. Stir in the cocoa powder until no lumps remain. Let it cool to lukewarm, not hot.
- Beat the cream cheese: In a large bowl, beat the cream cheese with a mixer on medium speed until very smooth and fluffy, about 2–3 minutes. Scrape down the bowl.
- Add sugar, vanilla, and salt: Beat in the powdered sugar, vanilla, and salt until combined and silky. Scrape the bowl again for an even texture.
- Incorporate the chocolate: Pour the cooled melted chocolate mixture into the cream cheese. Mix on low until fully blended and uniform in color.
- Whip the cream: In a separate clean bowl, whip the cold heavy cream to stiff peaks. It should stand up on the whisk without drooping.
- Fold gently: Using a spatula, fold the whipped cream into the chocolate cheesecake base in 2–3 additions. Keep it gentle to preserve the airy texture.
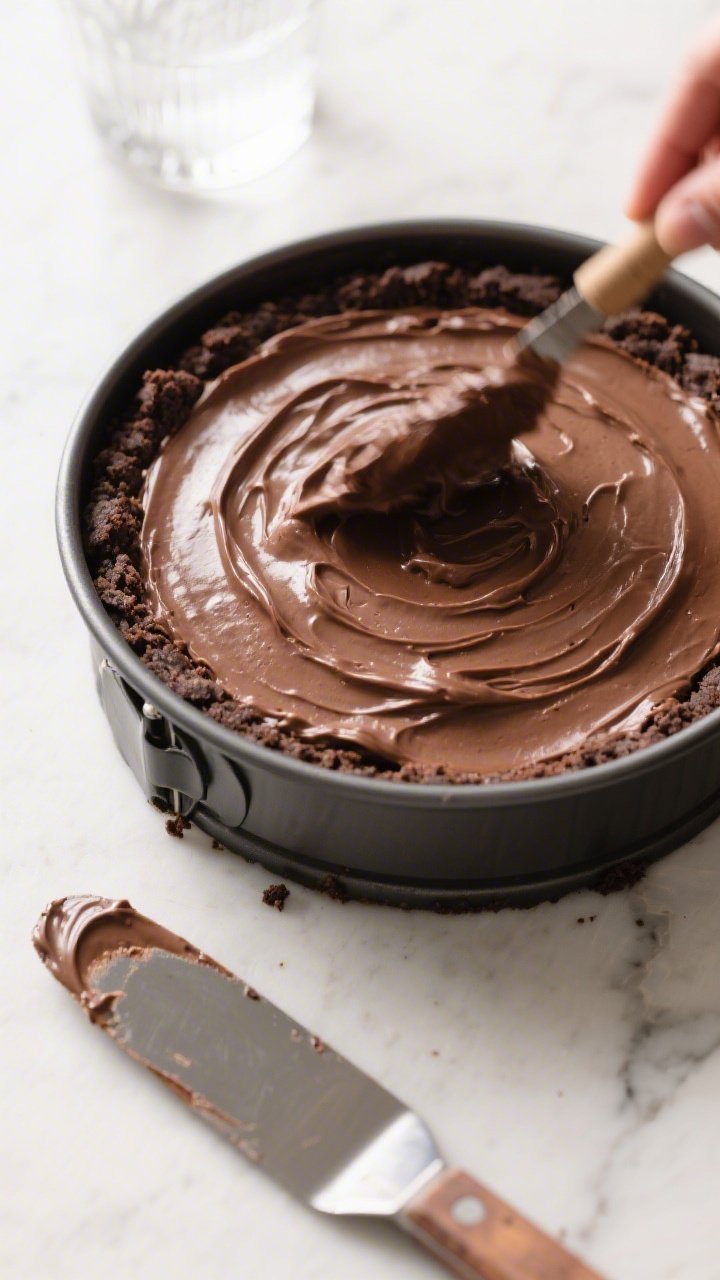
- Fill the crust: Spoon the mixture into the chilled crust. Smooth the top with an offset spatula. Tap the pan lightly on the counter to release air bubbles.
- Chill to set: Cover and refrigerate for at least 6 hours, preferably overnight, until firm enough to slice cleanly.
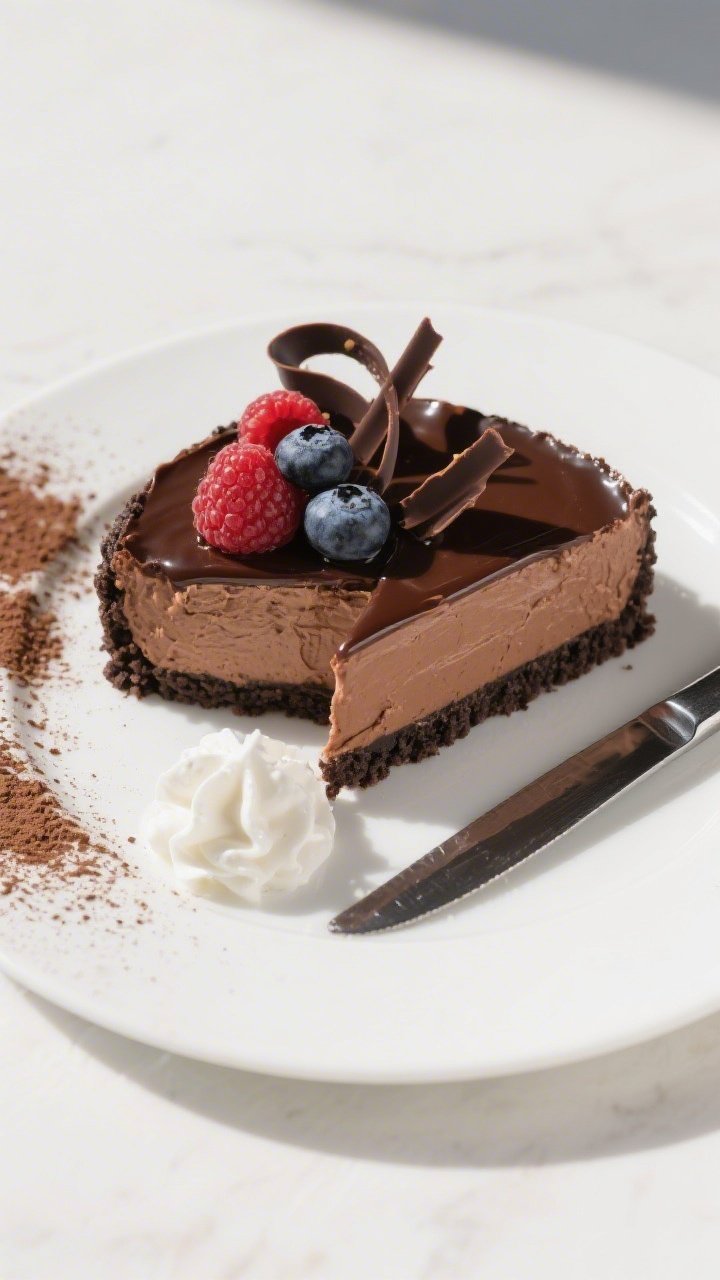
- Unmold and garnish: Run a thin knife around the edge, release the springform ring, and slide onto a serving platter. Add toppings like chocolate shavings or berries just before serving.
Overeating is a pattern. This helps you fix that problem. A quick reset for cravings, snacking, and “I’ll start tomorrow” moments.
Built for busy home cooks who want real-life structure. Simple steps that fit meal prep, family dinners, and late-night snack attacks.
What Makes This Recipe So Good
- No baking required: Great for warm days or when you don’t want to heat up the kitchen.
- Ultra-creamy texture: The combination of cream cheese and whipped cream yields a mousse-like filling.
- Balanced chocolate flavor: Melted chocolate and cocoa powder bring depth without bitterness.
- Foolproof crust: A classic chocolate cookie crust that holds together and slices cleanly.
- Make-ahead friendly: Sets in the fridge, so it’s ready when you are.
Ingredients
- For the crust:
- 24 chocolate sandwich cookies (about 250 g), finely crushed
- 6 tablespoons unsalted butter, melted
- 1 tablespoon granulated sugar (optional, for extra sweetness)
- Pinch of salt
- For the filling:
- 12 ounces (340 g) semi-sweet chocolate, chopped
- 2 tablespoons unsweetened cocoa powder
- 24 ounces (680 g) full-fat cream cheese, softened to room temperature
- 3/4 cup powdered sugar, sifted
- 1 teaspoon pure vanilla extract
- 1/8 teaspoon fine salt
- 1 cup cold heavy whipping cream
- Optional toppings:
- Chocolate shavings or curls
- Fresh berries
- Lightly sweetened whipped cream
- A drizzle of chocolate or caramel sauce
Instructions
- Prepare the pan: Line the bottom of a 9-inch springform pan with parchment paper. Lightly grease the sides if you like cleaner releases.
- Make the crust: In a bowl, combine the crushed cookies, melted butter, sugar, and a pinch of salt.
Mix until the crumbs feel like wet sand and hold together when pressed.
- Press and chill: Firmly press the crumb mixture into the bottom of the pan and slightly up the sides. Use a flat-bottom glass to compact it. Refrigerate while you make the filling.
- Melt the chocolate: Place the chopped chocolate in a heat-safe bowl.
Microwave in 20–30 second bursts, stirring between each, until smooth. Stir in the cocoa powder until no lumps remain. Let it cool to lukewarm, not hot.
- Beat the cream cheese: In a large bowl, beat the cream cheese with a mixer on medium speed until very smooth and fluffy, about 2–3 minutes.
Scrape down the bowl.
- Add sugar, vanilla, and salt: Beat in the powdered sugar, vanilla, and salt until combined and silky. Scrape the bowl again for an even texture.
- Incorporate the chocolate: Pour the cooled melted chocolate mixture into the cream cheese. Mix on low until fully blended and uniform in color.
- Whip the cream: In a separate clean bowl, whip the cold heavy cream to stiff peaks.
It should stand up on the whisk without drooping.
- Fold gently: Using a spatula, fold the whipped cream into the chocolate cheesecake base in 2–3 additions. Keep it gentle to preserve the airy texture.
- Fill the crust: Spoon the mixture into the chilled crust. Smooth the top with an offset spatula.
Tap the pan lightly on the counter to release air bubbles.
- Chill to set: Cover and refrigerate for at least 6 hours, preferably overnight, until firm enough to slice cleanly.
- Unmold and garnish: Run a thin knife around the edge, release the springform ring, and slide onto a serving platter. Add toppings like chocolate shavings or berries just before serving.
Storage Instructions
- Refrigerator: Cover loosely with plastic wrap or store in an airtight container. Keep chilled for up to 5 days.
- Freezer: Freeze whole or in slices.
Wrap tightly in plastic, then foil, or use freezer-safe containers. Freeze up to 2 months. Thaw overnight in the fridge.
- Serving after storage: For the best texture, let chilled slices sit at room temperature for 10–15 minutes before serving.

Benefits of This Recipe
- Quick prep, big payoff: Minimal hands-on time for a dessert that looks bakery-worthy.
- Reliable texture: Whipped cream stabilizes the filling without gelatin, keeping it light yet sliceable.
- Customizable: Works with different chocolates, crusts, and toppings to fit your taste.
- No oven stress: Great for small kitchens, busy schedules, or hot weather.
- Make-ahead convenience: Sets in the fridge so you can prep the day before an event.
Common Mistakes to Avoid
- Using cold cream cheese: Cold blocks won’t blend smoothly and can leave lumps.
Soften fully at room temperature.
- Adding hot chocolate: If the melted chocolate is too warm, it can melt the mixture and ruin the structure. Cool it to lukewarm.
- Overmixing the whipped cream: Stirring too vigorously when folding knocks out air and makes the texture dense.
- Skipping the chill time: The cheesecake needs several hours to set. Cutting too soon leads to messy slices.
- Under-pressing the crust: A loosely packed crust crumbles.
Press it down firmly so it holds together.
Variations You Can Try
- Dark chocolate: Use 70% cocoa chocolate for a richer, slightly less sweet filling. Add 1–2 tablespoons extra powdered sugar if needed.
- Milk chocolate: Sweeter and creamier. Reduce powdered sugar by 2–3 tablespoons to keep it balanced.
- Oreo crust with filling: Crush the cookies whole (filling and all) for a stickier, sweeter crust.
Skip the extra sugar.
- Nutty crunch: Fold in 1/2 cup toasted chopped hazelnuts or almonds for texture and flavor.
- Mocha version: Whisk 1–2 teaspoons instant espresso powder into the cocoa for a coffee kick.
- Salted caramel swirl: Dollop and swirl 1/3 cup thick caramel sauce into the top before chilling. Finish with flaky sea salt.
- Gluten-free: Use gluten-free chocolate cookies for the crust. Everything else stays the same.
- Mini cheesecakes: Press crust into lined muffin tins, fill, and chill for 3–4 hours.
Great for parties and portion control.
FAQ
Can I use whipped topping instead of heavy cream?
Yes, you can fold in an equal amount of thawed whipped topping if you prefer. The texture will be slightly sweeter and a bit more stable, but the flavor is still delicious.
Do I need gelatin for this to set?
No. The combination of melted chocolate and whipped cream stabilizes the filling.
As long as you chill it long enough, it will slice nicely without gelatin.
What if I don’t have a springform pan?
Use a 9-inch deep pie dish or an 8-inch square pan lined with parchment. You’ll scoop slices rather than releasing a ring, but it will taste just as good.
Can I make this less sweet?
Use dark chocolate (70%) and reduce the powdered sugar to 1/2 cup. Taste the filling before folding in the whipped cream and adjust to your preference.
Why is my filling grainy?
Graininess usually comes from cold cream cheese or overheated chocolate that seized.
Ensure the cream cheese is fully softened and the chocolate is smooth and only lukewarm before mixing.
How long does it need to chill?
Plan for at least 6 hours, but overnight is best. The extra time ensures clean slices and the right texture.
Can I add a fruit layer?
Yes. Spread a thin layer of raspberry or cherry preserves over the crust before adding the filling.
Keep it thin so the layers adhere well.
How do I make clean slices?
Use a sharp knife dipped in hot water and wiped dry between cuts. This helps glide through the creamy filling and keeps edges neat.
Is reduced-fat cream cheese okay?
You can use it, but the cheesecake will be softer and less rich. For the best texture, stick with full-fat cream cheese.
Can I make it ahead of time?
Absolutely.
Make it 1–2 days ahead, keep it chilled, and add toppings just before serving to keep them fresh.
In Conclusion
This no bake chocolate cheesecake is the kind of dessert that checks every box: easy, elegant, and irresistibly creamy. With a handful of staple ingredients and no oven time, you get a rich chocolate treat that feels special without the stress. Keep the base recipe as your go-to, and play with the variations to suit the occasion.
Whether it’s a dinner party or a low-key night in, this cheesecake is a reliable crowd-pleaser every single time.
Printable Recipe Card
Want just the essential recipe details without scrolling through the article? Get our printable recipe card with just the ingredients and instructions.