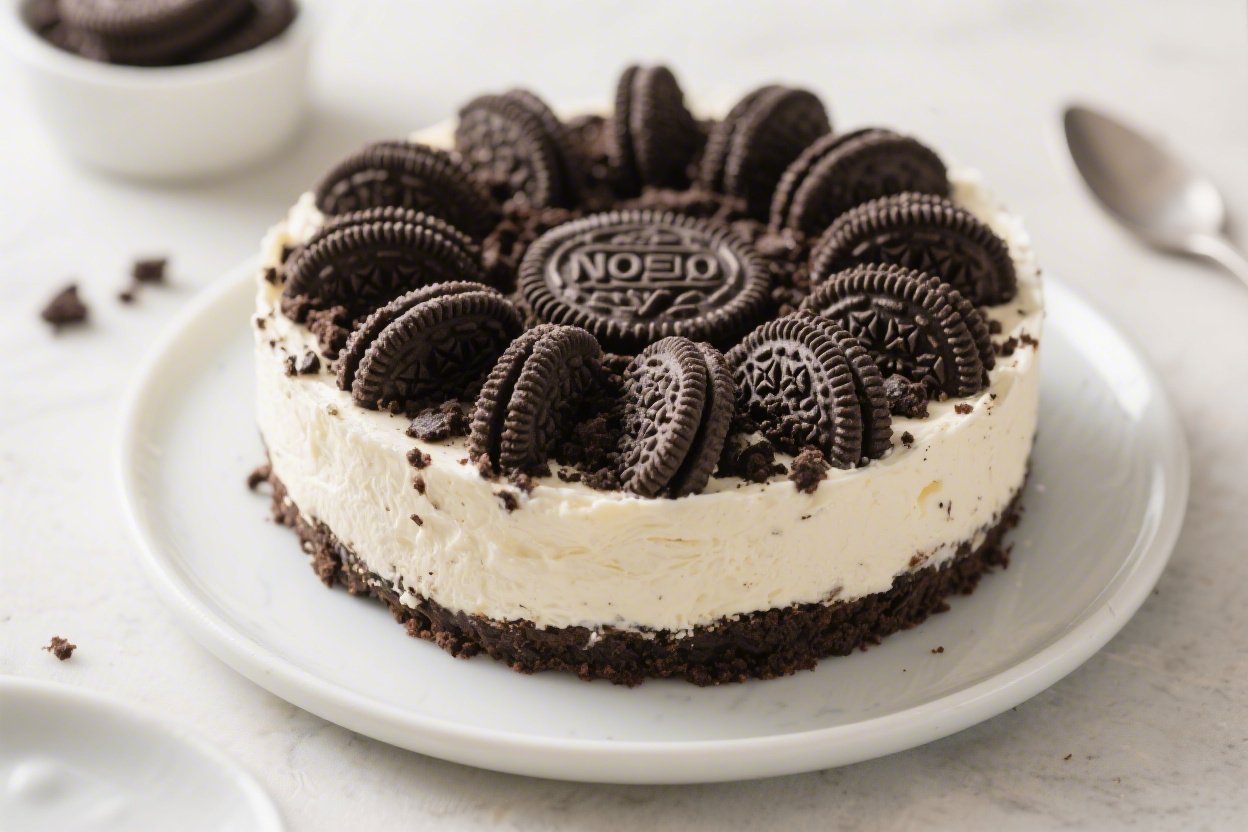
No Bake Oreo Cheesecake – Creamy, Crowd-Pleasing, and Easy
If you love Oreos and you love cheesecake, this dessert gives you the best of both without ever turning on the oven. It’s smooth, creamy, and loaded with crushed cookies in every bite. The crust is buttery and chocolatey, and the filling sets up beautifully in the fridge.
This is the kind of recipe you can make the night before a party and pull out when guests arrive. It looks impressive, tastes even better, and takes very little effort.
Ingredients
Method
- Prep your pan: Grease a 9-inch springform pan lightly and line the bottom with parchment. This makes slicing and unmolding cleaner.
- Make the crust: Add about 24 Oreos (filling and all) to a food processor. Pulse to fine crumbs. Stir in the melted butter until it resembles wet sand.
- Press the crust: Pour crumbs into the pan and press firmly into an even layer, going slightly up the sides. Use the bottom of a flat measuring cup for a smooth, compact crust. Chill while you make the filling.
- Whip the cream: In a cold bowl, whip heavy cream and powdered sugar to stiff peaks. Set aside in the fridge. This step gives the cheesecake lift and helps it set without gelatin.
- Beat the cream cheese: In a separate large bowl, beat softened cream cheese, granulated sugar, vanilla, lemon juice (if using), and a pinch of salt until very smooth and fluffy. Scrape the bowl a couple of times to avoid lumps.
- Fold in the whipped cream: Gently fold one-third of the whipped cream into the cream cheese mixture to lighten it. Fold in the rest in two additions until no streaks remain. Don’t deflate the mixture.
- Add the Oreos: Chop or crush 8–10 Oreos into chunky pieces. Fold them into the filling so you get pockets of cookie throughout.
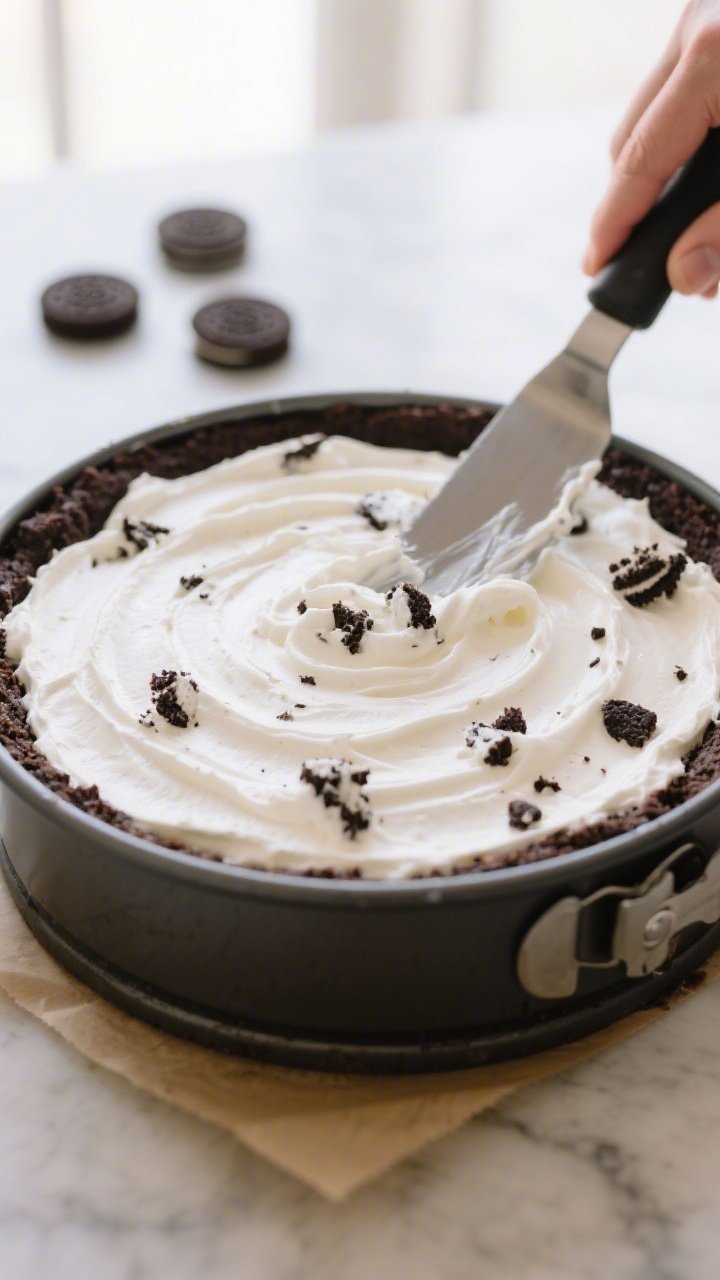
- Fill the pan: Spoon the filling over the chilled crust. Smooth the top with an offset spatula. Tap the pan lightly on the counter to release any large air bubbles.
- Chill to set: Cover with plastic wrap and refrigerate for at least 6 hours, preferably overnight. The longer chill helps clean slices and a firm, creamy set.
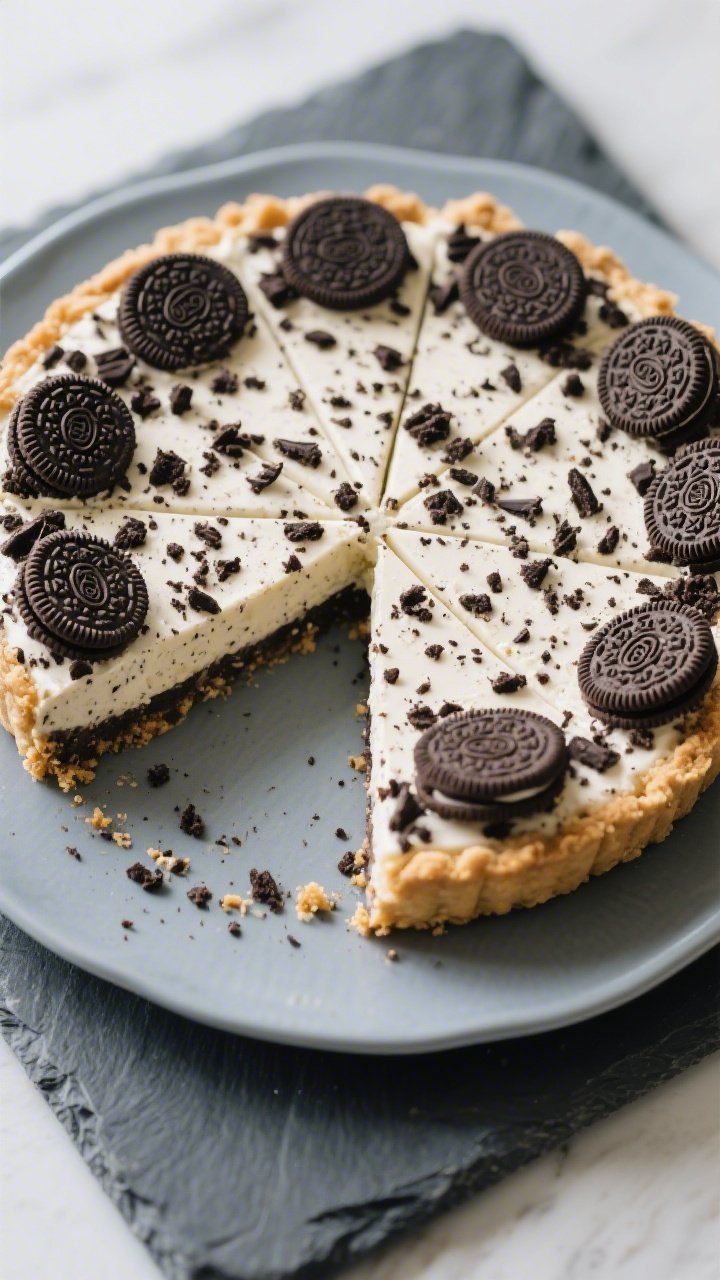
- Decorate and serve: Before serving, top with more crushed or halved Oreos, mini Oreos, or chocolate shavings. Run a thin knife around the edge, release the springform, slice with a hot, dry knife, and enjoy.
Overeating is a pattern. This helps you fix that problem. A quick reset for cravings, snacking, and “I’ll start tomorrow” moments.
Built for busy home cooks who want real-life structure. Simple steps that fit meal prep, family dinners, and late-night snack attacks.
What Makes This Recipe So Good
- No baking required: Perfect for warm days, busy schedules, or when you just don’t want to heat up the kitchen.
- Ultra-creamy texture: Whipped cream folded into the filling keeps it light yet rich, with that classic cheesecake tang.
- Big Oreo flavor: Cookies in the crust, cookies in the filling, and more on top—every layer delivers.
- Make-ahead friendly: It needs time to chill, so it’s ideal for preparing a day in advance.
- Beginner-friendly: No water baths, no cracked tops, no guesswork—just mix, spread, and chill.
Shopping List
- Oreo cookies: About 36–40 standard Oreos (for crust, filling mix-ins, and topping)
- Unsalted butter: 6 tablespoons (melted) for the crust
- Cream cheese: 24 ounces (three 8-ounce blocks), softened to room temperature
- Granulated sugar: 2/3 cup
- Vanilla extract: 1 1/2 teaspoons
- Fresh lemon juice (optional): 1–2 teaspoons for brightness
- Heavy whipping cream: 1 1/4 cups, cold
- Powdered sugar: 1/4 cup (to stabilize the whipped cream)
- Pinch of salt: Optional, to balance sweetness
- Optional garnishes: Mini Oreos, chocolate shavings, or a drizzle of chocolate sauce
Step-by-Step Instructions
- Prep your pan: Grease a 9-inch springform pan lightly and line the bottom with parchment. This makes slicing and unmolding cleaner.
- Make the crust: Add about 24 Oreos (filling and all) to a food processor.
Pulse to fine crumbs. Stir in the melted butter until it resembles wet sand.
- Press the crust: Pour crumbs into the pan and press firmly into an even layer, going slightly up the sides. Use the bottom of a flat measuring cup for a smooth, compact crust.
Chill while you make the filling.
- Whip the cream: In a cold bowl, whip heavy cream and powdered sugar to stiff peaks. Set aside in the fridge. This step gives the cheesecake lift and helps it set without gelatin.
- Beat the cream cheese: In a separate large bowl, beat softened cream cheese, granulated sugar, vanilla, lemon juice (if using), and a pinch of salt until very smooth and fluffy.
Scrape the bowl a couple of times to avoid lumps.
- Fold in the whipped cream: Gently fold one-third of the whipped cream into the cream cheese mixture to lighten it. Fold in the rest in two additions until no streaks remain. Don’t deflate the mixture.
- Add the Oreos: Chop or crush 8–10 Oreos into chunky pieces.
Fold them into the filling so you get pockets of cookie throughout.
- Fill the pan: Spoon the filling over the chilled crust. Smooth the top with an offset spatula. Tap the pan lightly on the counter to release any large air bubbles.
- Chill to set: Cover with plastic wrap and refrigerate for at least 6 hours, preferably overnight.
The longer chill helps clean slices and a firm, creamy set.
- Decorate and serve: Before serving, top with more crushed or halved Oreos, mini Oreos, or chocolate shavings. Run a thin knife around the edge, release the springform, slice with a hot, dry knife, and enjoy.
How to Store
- Refrigerator: Keep covered and chilled for up to 4–5 days. A cake carrier or an inverted bowl over the pan works well to protect the top.
- Freezer: Freeze whole or in slices.
Wrap tightly in plastic, then foil, and freeze for up to 2 months. Thaw overnight in the fridge before serving.
- Make ahead: Assemble up to 24 hours before serving for best texture and flavor.

Benefits of This Recipe
- Fast prep, big payoff: Minimal steps and no oven give you a dessert that looks bakery-level.
- Kid- and crowd-approved: Oreo flavor is a universal win, and the texture is sweet and silky.
- Flexible: Easy to scale for a larger pan or split into mini cheesecakes for parties.
- Reliable set: Whipped cream and cold time create a stable slice without using gelatin.
Pitfalls to Watch Out For
- Lumpy filling: If the cream cheese isn’t fully softened, you’ll get lumps. Bring it to room temperature and beat until smooth before folding in cream.
- Weak crust: Skimping on butter or not packing the crumbs tightly can cause crumbling.
Press firmly and chill to help it hold.
- Runny cheesecake: Not whipping the cream to stiff peaks or slicing before it’s fully chilled can lead to soft slices. Give it enough time.
- Soggy top: Topping with crushed Oreos too early can make them soften. Add final decorations just before serving.
Variations You Can Try
- Mint Oreo Cheesecake: Add 1/2 teaspoon peppermint extract to the filling and use Mint Oreos in the crust and mix-ins.
- Peanut Butter Swirl: Warm 1/3 cup creamy peanut butter until pourable and swirl it into the top before chilling.
Top with chopped peanuts.
- Chocolate Lover’s: Whisk 1/4 cup cocoa powder into the cream cheese mixture and add mini chocolate chips along with the Oreos.
- Salted Caramel: Drizzle caramel sauce over the crust before adding filling. Finish with flaky sea salt and more caramel on top.
- Gluten-Free: Use certified gluten-free chocolate sandwich cookies and ensure all ingredients are GF-labeled.
- Mini Cheesecakes: Press crust into a lined muffin tin and fill. Chill 3–4 hours.
Great for portion control and parties.
FAQ
Can I use whipped topping instead of whipped cream?
Yes, you can replace the homemade whipped cream with about 3 cups of whipped topping. The texture will be slightly different—sweeter and a bit more stable—but still delicious.
Do I need gelatin to help it set?
No. Stiffly whipped cream and proper chilling give you a clean set.
If you prefer an extra-firm slice for hot weather or transport, you can dissolve 1 teaspoon powdered gelatin in 2 tablespoons water, warm to melt, cool slightly, and mix into the cream cheese before folding in the whipped cream.
How do I keep the crust from sticking to the pan?
Line the bottom with parchment and lightly grease the sides. A warm, dry knife run around the edge before releasing the springform also helps release cleanly.
What if I don’t have a food processor?
Place Oreos in a sturdy zip-top bag and crush with a rolling pin. For finer crumbs, work in batches and press firmly.
Mix with melted butter in a bowl until evenly moistened.
Can I reduce the sugar?
You can cut the granulated sugar in the filling to 1/2 cup for a less sweet cheesecake. Keep the powdered sugar for the whipped cream to maintain structure, or reduce slightly if you don’t mind a softer set.
How long should I chill it?
At least 6 hours, but overnight (8–12 hours) is best. If you’re in a rush, chill it in the coldest part of your fridge and avoid frequent opening of the door.
What’s the best way to slice it cleanly?
Use a long, sharp knife warmed under hot water, then dried.
Make each cut in a single motion and wipe the blade clean between slices.
Can I make it dairy-free?
Yes. Use dairy-free cream cheese, a non-dairy whipped topping or coconut whipped cream, and plant-based butter. Choose dairy-free sandwich cookies.
Texture will vary slightly but it still works well.
Wrapping Up
No Bake Oreo Cheesecake is the easy dessert that always hits the mark—creamy, cookie-studded, and stunning on the table. With simple steps and no oven time, it’s perfect for weeknights, birthdays, or any time you need a dependable crowd-pleaser. Make it ahead, slice it clean, and watch it disappear.
Once you try it, this recipe will earn a regular spot in your dessert rotation.
Printable Recipe Card
Want just the essential recipe details without scrolling through the article? Get our printable recipe card with just the ingredients and instructions.