No Bake Melt-in-Your-Mouth Cheesecake – Easy, Creamy, and Crowd-Pleasing
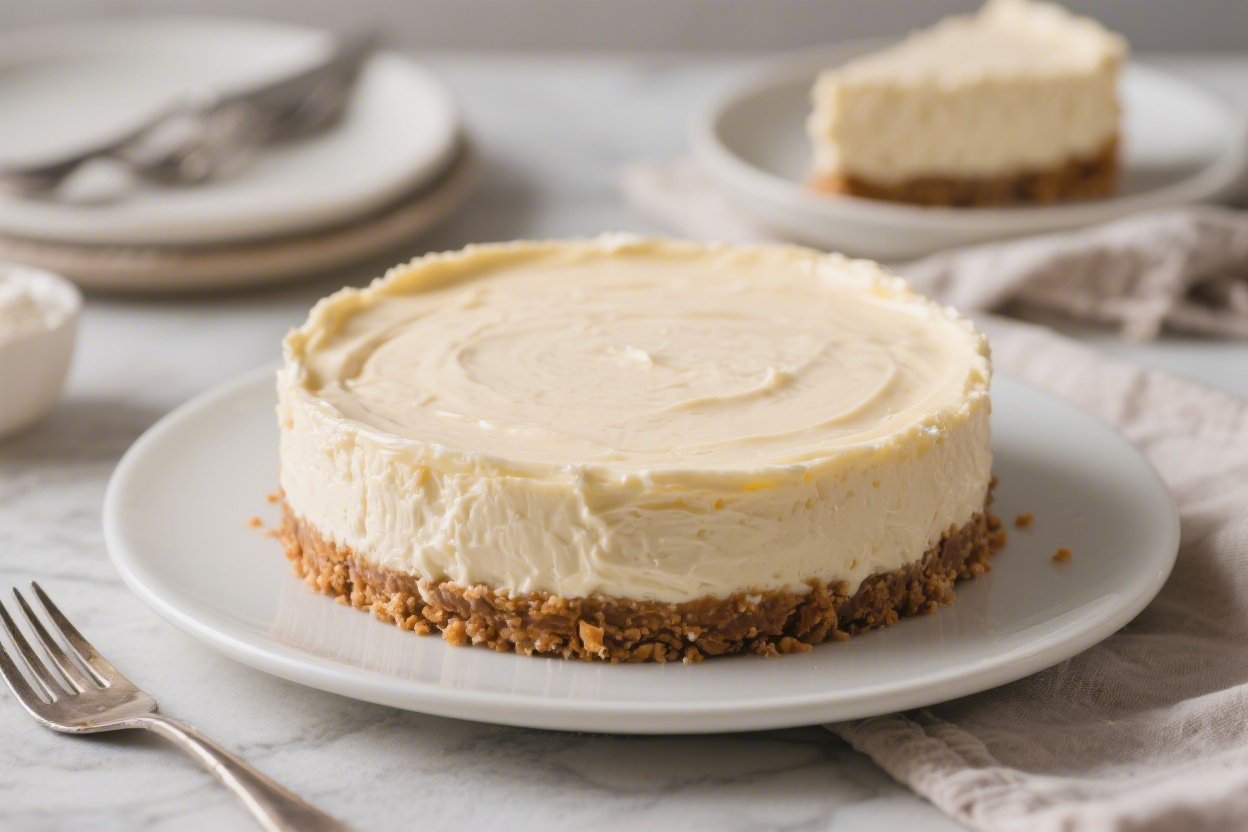
This no bake melt-in-your-mouth cheesecake is the kind of dessert that makes you look like a pro with almost no effort. It’s silky, light, and creamy, with a buttery graham cracker crust and a tangy, smooth filling. No oven, no water bath, no stress—just a simple chill in the fridge and you’re done.
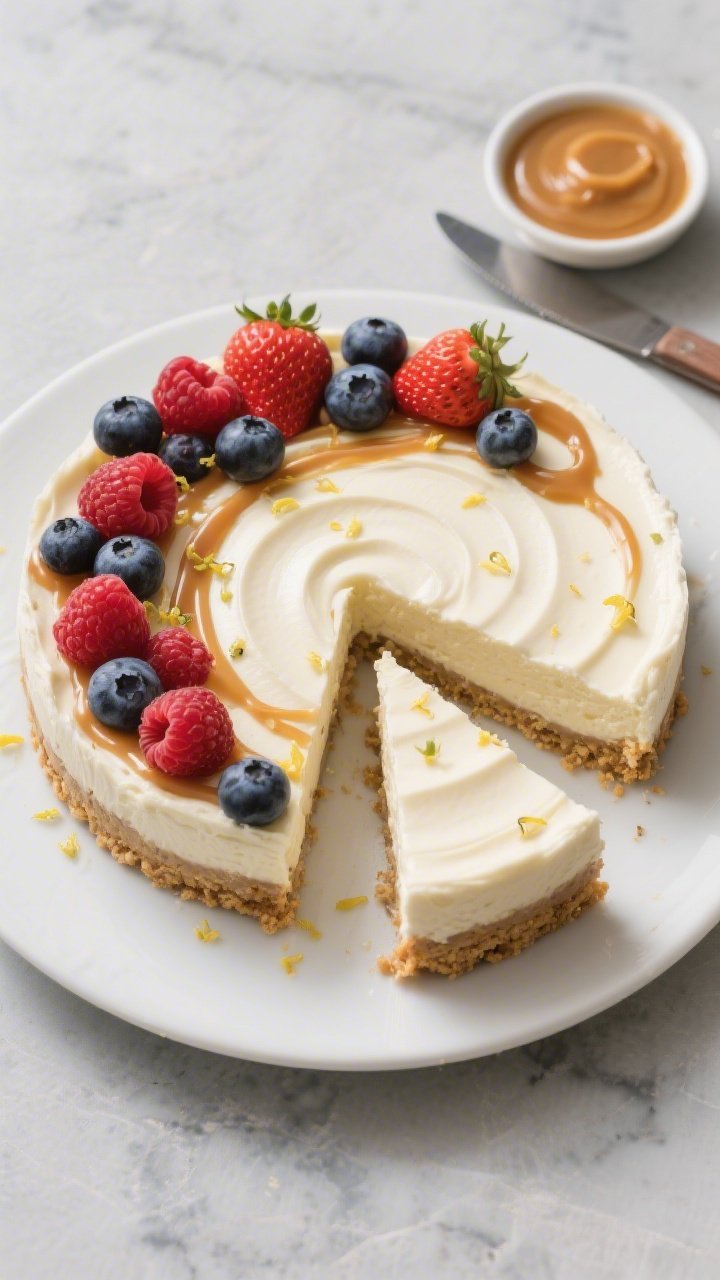
It’s perfect for warm days, busy weekends, and any time you need a dessert that never fails. Top it with fresh berries, a drizzle of caramel, or keep it classic and plain. Either way, it tastes like a slice of pure comfort.
Ingredients
Method
- Prepare the pan: Line the bottom of a 9-inch springform pan with parchment paper. Lightly grease the sides if you like for cleaner slices.
- Make the crust: In a bowl, stir together graham crumbs, sugar, and salt. Add melted butter and mix until the crumbs look like wet sand and clump when pressed.
- Press and chill: Pour the crust mixture into the pan. Use the bottom of a flat measuring cup to press it firmly and evenly across the base and slightly up the sides. Chill in the fridge while you make the filling.
- Beat the cream cheese: In a large bowl, beat the softened cream cheese with a hand mixer (or stand mixer) until smooth and lump-free, about 2 minutes. Scrape down the bowl.
- Add flavor and sweetness: Beat in powdered sugar, vanilla, lemon juice, and lemon zest until silky and combined.
- Whip the cream: In a separate chilled bowl, whip the cold heavy cream to stiff peaks. It should look thick and hold its shape when you lift the beaters.
- Fold it in: Gently fold the whipped cream into the cream cheese mixture in 2 to 3 additions. Use a spatula and light strokes to keep the mixture airy. Stop as soon as it’s uniform.
- Fill the crust: Spoon the filling into the chilled crust and smooth the top with an offset spatula. Tap the pan lightly on the counter to release any big air pockets.
- Chill to set: Cover and refrigerate for at least 6 hours, preferably overnight, until fully set and sliceable.
- Serve: Release the springform, remove the ring, and slide onto a serving plate. Add your favorite toppings just before serving. Slice with a warm, clean knife for neat edges.
Overeating is a pattern. This helps you fix that problem. A quick reset for cravings, snacking, and “I’ll start tomorrow” moments.
Built for busy home cooks who want real-life structure. Simple steps that fit meal prep, family dinners, and late-night snack attacks.
What Makes This Recipe So Good

- No baking required: Keep your kitchen cool and your timeline simple.
Everything sets beautifully in the fridge.
- Ultra creamy texture: A blend of cream cheese and whipped cream gives it that cloud-like, melt-in-your-mouth feel.
- Balanced flavor: A touch of lemon and vanilla brightens the cheesecake without overpowering it.
- Foolproof and flexible: Easy for beginners, endlessly customizable with crusts and toppings.
- Make-ahead friendly: Sets overnight and slices cleanly the next day—great for parties and holidays.
Ingredients
- For the crust:
- 1 1/2 cups (150 g) graham cracker crumbs
- 1/3 cup (70 g) granulated sugar
- 6 tablespoons (85 g) unsalted butter, melted
- Pinch of fine salt
- For the filling:
- 16 ounces (450 g) full-fat cream cheese, softened to room temperature
- 3/4 cup (90 g) powdered sugar
- 1 teaspoon pure vanilla extract
- 2 teaspoons fresh lemon juice
- 1 teaspoon finely grated lemon zest (optional but recommended)
- 1 cup (240 ml) cold heavy whipping cream
- For topping (optional):
- Fresh berries, berry compote, lemon curd, or caramel sauce
Instructions
- Prepare the pan: Line the bottom of a 9-inch springform pan with parchment paper. Lightly grease the sides if you like for cleaner slices.
- Make the crust: In a bowl, stir together graham crumbs, sugar, and salt. Add melted butter and mix until the crumbs look like wet sand and clump when pressed.
- Press and chill: Pour the crust mixture into the pan.
Use the bottom of a flat measuring cup to press it firmly and evenly across the base and slightly up the sides. Chill in the fridge while you make the filling.
- Beat the cream cheese: In a large bowl, beat the softened cream cheese with a hand mixer (or stand mixer) until smooth and lump-free, about 2 minutes. Scrape down the bowl.
- Add flavor and sweetness: Beat in powdered sugar, vanilla, lemon juice, and lemon zest until silky and combined.
- Whip the cream: In a separate chilled bowl, whip the cold heavy cream to stiff peaks.
It should look thick and hold its shape when you lift the beaters.
- Fold it in: Gently fold the whipped cream into the cream cheese mixture in 2 to 3 additions. Use a spatula and light strokes to keep the mixture airy. Stop as soon as it’s uniform.
- Fill the crust: Spoon the filling into the chilled crust and smooth the top with an offset spatula.
Tap the pan lightly on the counter to release any big air pockets.
- Chill to set: Cover and refrigerate for at least 6 hours, preferably overnight, until fully set and sliceable.
- Serve: Release the springform, remove the ring, and slide onto a serving plate. Add your favorite toppings just before serving. Slice with a warm, clean knife for neat edges.
Storage Instructions
- Refrigerator: Cover tightly and refrigerate for up to 5 days.
Keep toppings separate until serving for best texture.
- Freezer: Freeze the whole cheesecake (without fresh fruit) or individual slices for up to 2 months. Wrap well in plastic and foil. Thaw overnight in the fridge.
- Transport tips: Keep chilled in a cooler pack if traveling.
Add toppings at the destination.

Benefits of This Recipe
- Time saver: No oven time and minimal prep means you can make it while cooking dinner or getting ready for guests.
- Beginner-friendly: Simple steps and easy-to-find ingredients keep it stress-free.
- Light yet indulgent: Whipped cream lifts the texture, so it feels luxurious without being heavy.
- Budget-conscious: Basic pantry items and a short ingredient list keep costs down.
- Versatile: Works with many crusts, flavors, and toppings to match the season.
What Not to Do
- Don’t use low-fat cream cheese: It won’t set as well and can taste chalky. Full-fat is key for a creamy finish.
- Don’t skip softening the cream cheese: Cold cream cheese leads to lumps that are hard to fix later.
- Don’t overmix after adding whipped cream: Overmixing knocks out air and makes the filling dense.
- Don’t rush the chill time: If you cut too soon, the slices won’t hold. Overnight is best.
- Don’t add watery toppings early: Sauces and juicy fruit can make the surface soggy.
Add just before serving.
Variations You Can Try
- Chocolate swirl: Melt 3 ounces of dark chocolate, cool slightly, and swirl into the top of the filling before chilling.
- Oreo crust: Swap graham crumbs for crushed chocolate sandwich cookies (filling included). Skip the added sugar in the crust.
- Lemon lovers: Increase lemon juice to 1 tablespoon and fold in 2 tablespoons lemon curd. Top with more curd and zest.
- Berry burst: Gently fold 1/2 cup chopped strawberries or raspberries into the filling.
Pat dry first to reduce moisture.
- Salted caramel: Drizzle caramel over the chilled cake and sprinkle with flaky sea salt.
- Gluten-free: Use gluten-free graham crackers or almond flour crust (1 1/2 cups almond flour, 1/4 cup sugar, 5 tablespoons butter, pinch of salt; lightly toast almond flour first for flavor).
FAQ
Can I make this without a springform pan?
Yes. Use a deep 9-inch pie dish or an 8×8-inch square pan. Line with parchment for easier removal and cut into bars if using a square pan.
Why isn’t my cheesecake firm?
It may need more chill time.
Also check that you used full-fat cream cheese, whipped the cream to stiff peaks, and didn’t overmix when folding. Too much lemon juice or liquidy add-ins can also soften the set.
Can I use store-bought whipped topping instead of whipped cream?
You can, but the flavor and texture are best with real whipped cream. If using whipped topping, fold it in gently and reduce powdered sugar slightly to avoid oversweetness.
How do I prevent lumps in the filling?
Start with room-temperature cream cheese and beat it until completely smooth before adding anything else.
Sift the powdered sugar and scrape the bowl often. Fold in the whipped cream gently.
What’s the best way to slice cleanly?
Use a sharp, thin knife dipped in hot water. Wipe and rewarm the blade between slices.
This keeps edges smooth and neat.
Can I make it ahead for a party?
Absolutely. Make it 1–2 days ahead and keep it covered in the fridge. Add toppings right before serving for the freshest look and texture.
Is there a way to make it less sweet?
Reduce powdered sugar to 1/2 cup and increase lemon juice by 1 teaspoon.
Choose tart toppings like fresh berries to balance the flavor.
In Conclusion
This no bake melt-in-your-mouth cheesecake is simple, reliable, and endlessly adaptable. With a buttery crust, a velvety filling, and no oven required, it’s the dessert you can count on any time. Make it the day before, slice it clean, and dress it up however you like.
One bite, and you’ll see why it’s a keeper.
Printable Recipe Card
Want just the essential recipe details without scrolling through the article? Get our printable recipe card with just the ingredients and instructions.