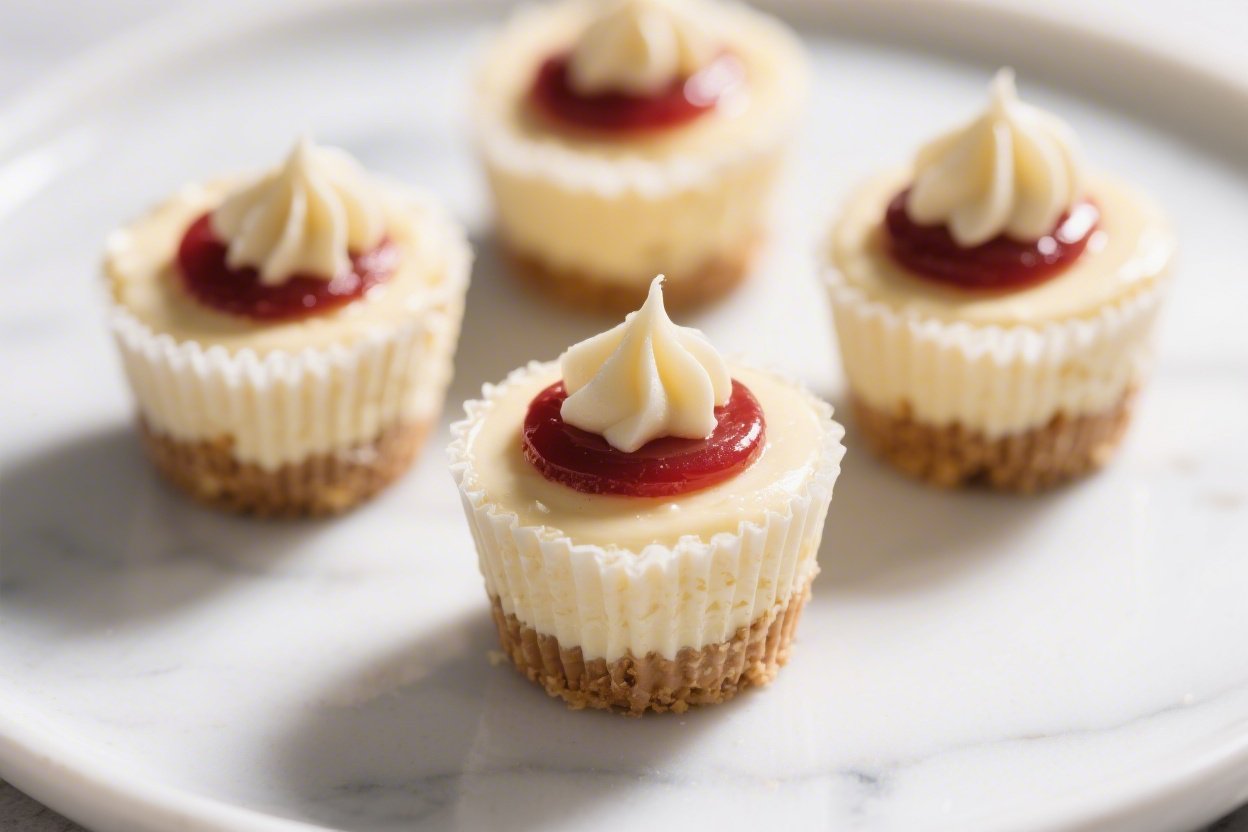
No Bake Mini Cheesecake Cups – Creamy, Easy, and Perfectly Portable
No oven, no fuss, and no waiting on a water bath. These no bake mini cheesecake cups are smooth, rich, and surprisingly simple to make. They set up in the fridge and pop right out of the liners like little dessert gems.
Great for parties, weeknight treats, or a make-ahead dessert you can grab whenever the craving hits. Top them with fruit, chocolate, or a drizzle of caramel—whatever you love most.
Ingredients
Method
- Line your pan: Place cupcake liners in a standard 12-cup muffin pan. This keeps the crust tidy and makes unmolding easy.
- Make the crust: In a bowl, combine graham cracker crumbs, sugar, melted butter, and a pinch of salt. Stir until the texture looks like damp sand and holds when pressed.
- Press it in: Divide the crumb mixture evenly across the liners. Press firmly with the bottom of a small glass or spoon to create a tight, even base. A firm pack helps slices hold together.
- Chill the crusts: Place the pan in the fridge while you make the filling. Ten minutes is enough to set the butter and keep crumbs in place.
- Whip the cream: In a cold bowl, beat heavy cream with powdered sugar to medium-stiff peaks. Set aside. Whipping separately keeps the filling light.
- Beat the cream cheese: In another bowl, beat softened cream cheese until completely smooth and no lumps remain. Add granulated sugar, vanilla, and lemon juice. Beat until glossy and creamy.
- Fold gently: Using a spatula, fold the whipped cream into the cream cheese mixture in two or three additions. Keep strokes gentle to avoid deflating the cream.
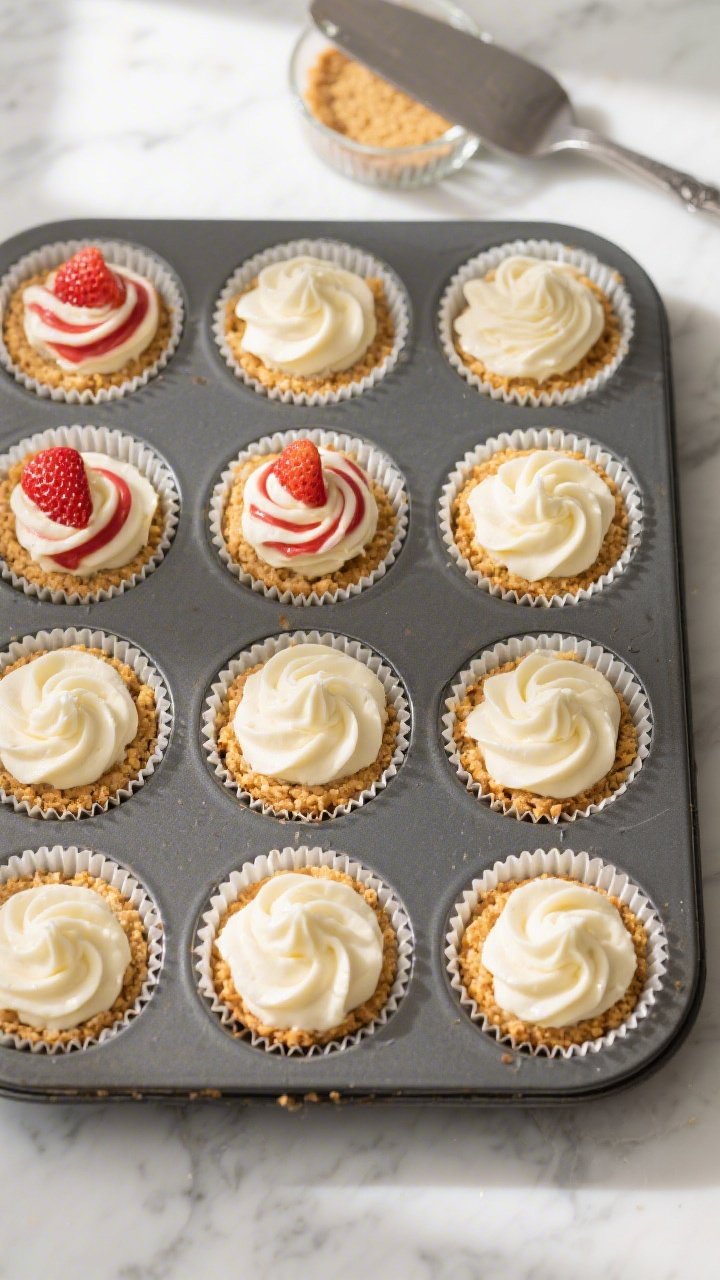
- Fill the cups: Spoon or pipe the filling onto the chilled crusts, smoothing the tops. Fill each cup nearly to the top for a generous portion.
- Chill to set: Refrigerate for at least 3 hours, or until the centers feel firm and hold their shape. Overnight chilling gives the cleanest texture.
- Add toppings: Right before serving, top with fresh fruit, sauces, or chocolate. Keep it light so the cheesecake remains the star.
- Unmold and enjoy: Lift each cheesecake out of the pan by the liner. Peel away the liner for clean edges or serve as-is for easy handling.
Overeating is a pattern. This helps you fix that problem. A quick reset for cravings, snacking, and “I’ll start tomorrow” moments.
Built for busy home cooks who want real-life structure. Simple steps that fit meal prep, family dinners, and late-night snack attacks.
What Makes This Recipe So Good
- No oven needed: Perfect for warm days, small kitchens, or when you just don’t feel like baking.
- Quick to assemble: The crust presses in, the filling whips up fast, and the fridge does the rest.
- Individual portions: Easy to serve, easy to store, and great for parties or lunchbox treats.
- Ultra creamy texture: Whipped cream folded into a tangy cream cheese base keeps things light but luxurious.
- Endlessly customizable: Use any cookie for the crust and any topping you like—from lemon curd to hot fudge.
Ingredients
- For the crust:
- 1 1/2 cups (150 g) graham cracker crumbs (or digestive biscuit crumbs)
- 2 tablespoons granulated sugar
- 5 tablespoons unsalted butter, melted
- Pinch of fine salt
- For the filling:
- 16 ounces (450 g) full-fat cream cheese, softened to room temperature
- 1/2 cup (100 g) granulated sugar
- 2 teaspoons pure vanilla extract
- 1 tablespoon fresh lemon juice
- 1 cup (240 ml) cold heavy whipping cream
- 1/3 cup (40 g) powdered sugar
- For topping (choose your favorites):
- Fresh berries, sliced stone fruit, or citrus segments
- Fruit compote or jam
- Chocolate shavings or mini chocolate chips
- Salted caramel or chocolate sauce
- Lemon curd
- Equipment: 12-cup muffin pan, paper or foil cupcake liners, mixing bowls, hand mixer or stand mixer
Step-by-Step Instructions

- Line your pan: Place cupcake liners in a standard 12-cup muffin pan. This keeps the crust tidy and makes unmolding easy.
- Make the crust: In a bowl, combine graham cracker crumbs, sugar, melted butter, and a pinch of salt.
Stir until the texture looks like damp sand and holds when pressed.
- Press it in: Divide the crumb mixture evenly across the liners. Press firmly with the bottom of a small glass or spoon to create a tight, even base. A firm pack helps slices hold together.
- Chill the crusts: Place the pan in the fridge while you make the filling.
Ten minutes is enough to set the butter and keep crumbs in place.
- Whip the cream: In a cold bowl, beat heavy cream with powdered sugar to medium-stiff peaks. Set aside. Whipping separately keeps the filling light.
- Beat the cream cheese: In another bowl, beat softened cream cheese until completely smooth and no lumps remain.
Add granulated sugar, vanilla, and lemon juice. Beat until glossy and creamy.
- Fold gently: Using a spatula, fold the whipped cream into the cream cheese mixture in two or three additions. Keep strokes gentle to avoid deflating the cream.
- Fill the cups: Spoon or pipe the filling onto the chilled crusts, smoothing the tops.
Fill each cup nearly to the top for a generous portion.
- Chill to set: Refrigerate for at least 3 hours, or until the centers feel firm and hold their shape. Overnight chilling gives the cleanest texture.
- Add toppings: Right before serving, top with fresh fruit, sauces, or chocolate. Keep it light so the cheesecake remains the star.
- Unmold and enjoy: Lift each cheesecake out of the pan by the liner.
Peel away the liner for clean edges or serve as-is for easy handling.
Storage Instructions
- Refrigerator: Store covered for up to 5 days. Keep toppings separate until serving to maintain texture.
- Freezer: Freeze without toppings. Place set cheesecakes on a tray to freeze solid, then transfer to an airtight container.
Freeze up to 2 months. Thaw in the fridge for several hours.
- Travel: If taking to a party, keep them chilled in a cooler. Add fruit or sauces at the last minute.

Why This is Good for You
- Built-in portion control: Individual cups make it simple to enjoy a treat without going overboard.
- Protein and calcium: Cream cheese and whipped cream offer a bit of both, especially when paired with fresh fruit.
- Lower stress, same payoff: No bake means fewer steps and less chance of overbaking or cracking, so you get consistent results.
- Customizable sweetness: You control the sugar and can lean into fresh fruit for a brighter finish.
What Not to Do
- Don’t use cold cream cheese: It won’t beat smooth and can leave lumps.
Let it soften fully at room temperature.
- Don’t skip the chill: These need time to set. Rushing leads to slouchy, messy cups.
- Don’t overmix the whipped cream: Fold gently. Overmixing can deflate or turn the texture grainy.
- Don’t overload with wet toppings: Too much sauce can make the tops slippery and the crust soggy.
Use a light hand.
- Don’t under-pack the crust: A loose crust will crumble. Press it in firmly for clean bites.
Recipe Variations
- Chocolate Cookie Crust: Swap graham crumbs for chocolate wafer or Oreo crumbs (skip the extra sugar if using sandwich cookies).
- Lemon Blueberry: Add 1 extra tablespoon lemon juice and 1 teaspoon lemon zest to the filling. Top with fresh blueberries or a quick blueberry compote.
- Strawberry Swirl: Spoon teaspoons of strawberry jam onto the filled cups and gently swirl with a toothpick before chilling.
- Salted Caramel Pretzel: Use crushed pretzels for half the crust crumbs.
Finish with caramel and a pinch of flaky salt.
- Mocha Chip: Add 1 teaspoon instant espresso powder dissolved in 1 teaspoon warm water to the filling. Fold in mini chocolate chips.
- Greek Yogurt Lightened: Replace 4 ounces of cream cheese with 1/2 cup thick Greek yogurt. The texture is slightly tangier and lighter.
- Berry No-Refined-Sugar: Use honey or maple syrup (about 1/3 cup) in the filling instead of granulated sugar.
Sweeten the crust lightly or leave it unsweetened.
FAQ
Can I make these without whipped cream?
Yes. Replace the whipped cream with 8 ounces of thawed whipped topping for a shortcut, or use an extra 4 ounces of cream cheese plus 1–2 tablespoons milk for a denser, more classic texture.
How do I keep the crust from crumbling?
Pack it firmly and use the right butter-to-crumb ratio. If it still crumbles, add 1 more tablespoon melted butter or a teaspoon of honey to help it bind.
Can I use a mini muffin pan?
Absolutely.
Line with mini liners and press in about 1 teaspoon of crust per cup. Fill to the top and chill. Start checking at 1.5–2 hours; they set faster.
What if I don’t have a mixer?
You can use a sturdy whisk.
Beat the cream cheese very well to remove lumps, and whip the cream in a chilled bowl with a whisk until thick. It takes longer, but it works.
Do these hold up at room temperature?
They’re best served cold. For parties, keep them chilled and set out for up to 1 hour at a time.
In hot weather, limit to 30 minutes.
Can I make them gluten-free?
Yes. Use gluten-free graham crackers or cookies for the crust. Everything else in the base recipe is naturally gluten-free—just check labels to be safe.
How sweet are they?
They’re mildly sweet with a tangy finish.
If you prefer sweeter, add 2–3 extra tablespoons sugar to the filling or use a sweeter topping.
What’s the best way to get clean edges?
Chill overnight, then peel the liners away slowly. For super-smooth tops, pipe the filling with a large round tip rather than spooning.
In Conclusion
No bake mini cheesecake cups bring all the flavor and creaminess of classic cheesecake without the stress. They’re simple to prep, easy to customize, and just the right size for sharing—or not sharing.
Keep a batch in the fridge, switch up the toppings, and you’ve got a reliable, crowd-pleasing dessert any night of the week. Simple, creamy, and always a hit.
Printable Recipe Card
Want just the essential recipe details without scrolling through the article? Get our printable recipe card with just the ingredients and instructions.